Google Sign-in Configuration
Overview
Google Sign-in Configuration will be done in three steps:
A. Create your Google Cloud Project
Create an app in the Google Developer portal and add Google Login capability.
B. Configure iOS
Configure your Google app to support iOS based on Bundle ID.
C. Configure Android.
Configure your Google app to support Android based on Package Name and signing key. Note: If you are building your application from multiple machines you will need to create an OAuth client ID and provide the SHA-1 Certificate fingerprint used by each machine.
Already have a Google app?
If you already have an existing Google app you may skip to iOS Configuration or Android Configuration configuration steps below.**
A. Create your Cloud Project
Step A1. Log in and create a new cloud project.
Log into your account. Under the "New Project" page, name your project by entering a name in the field indicated. For example, see "MynewApp" in green box below.
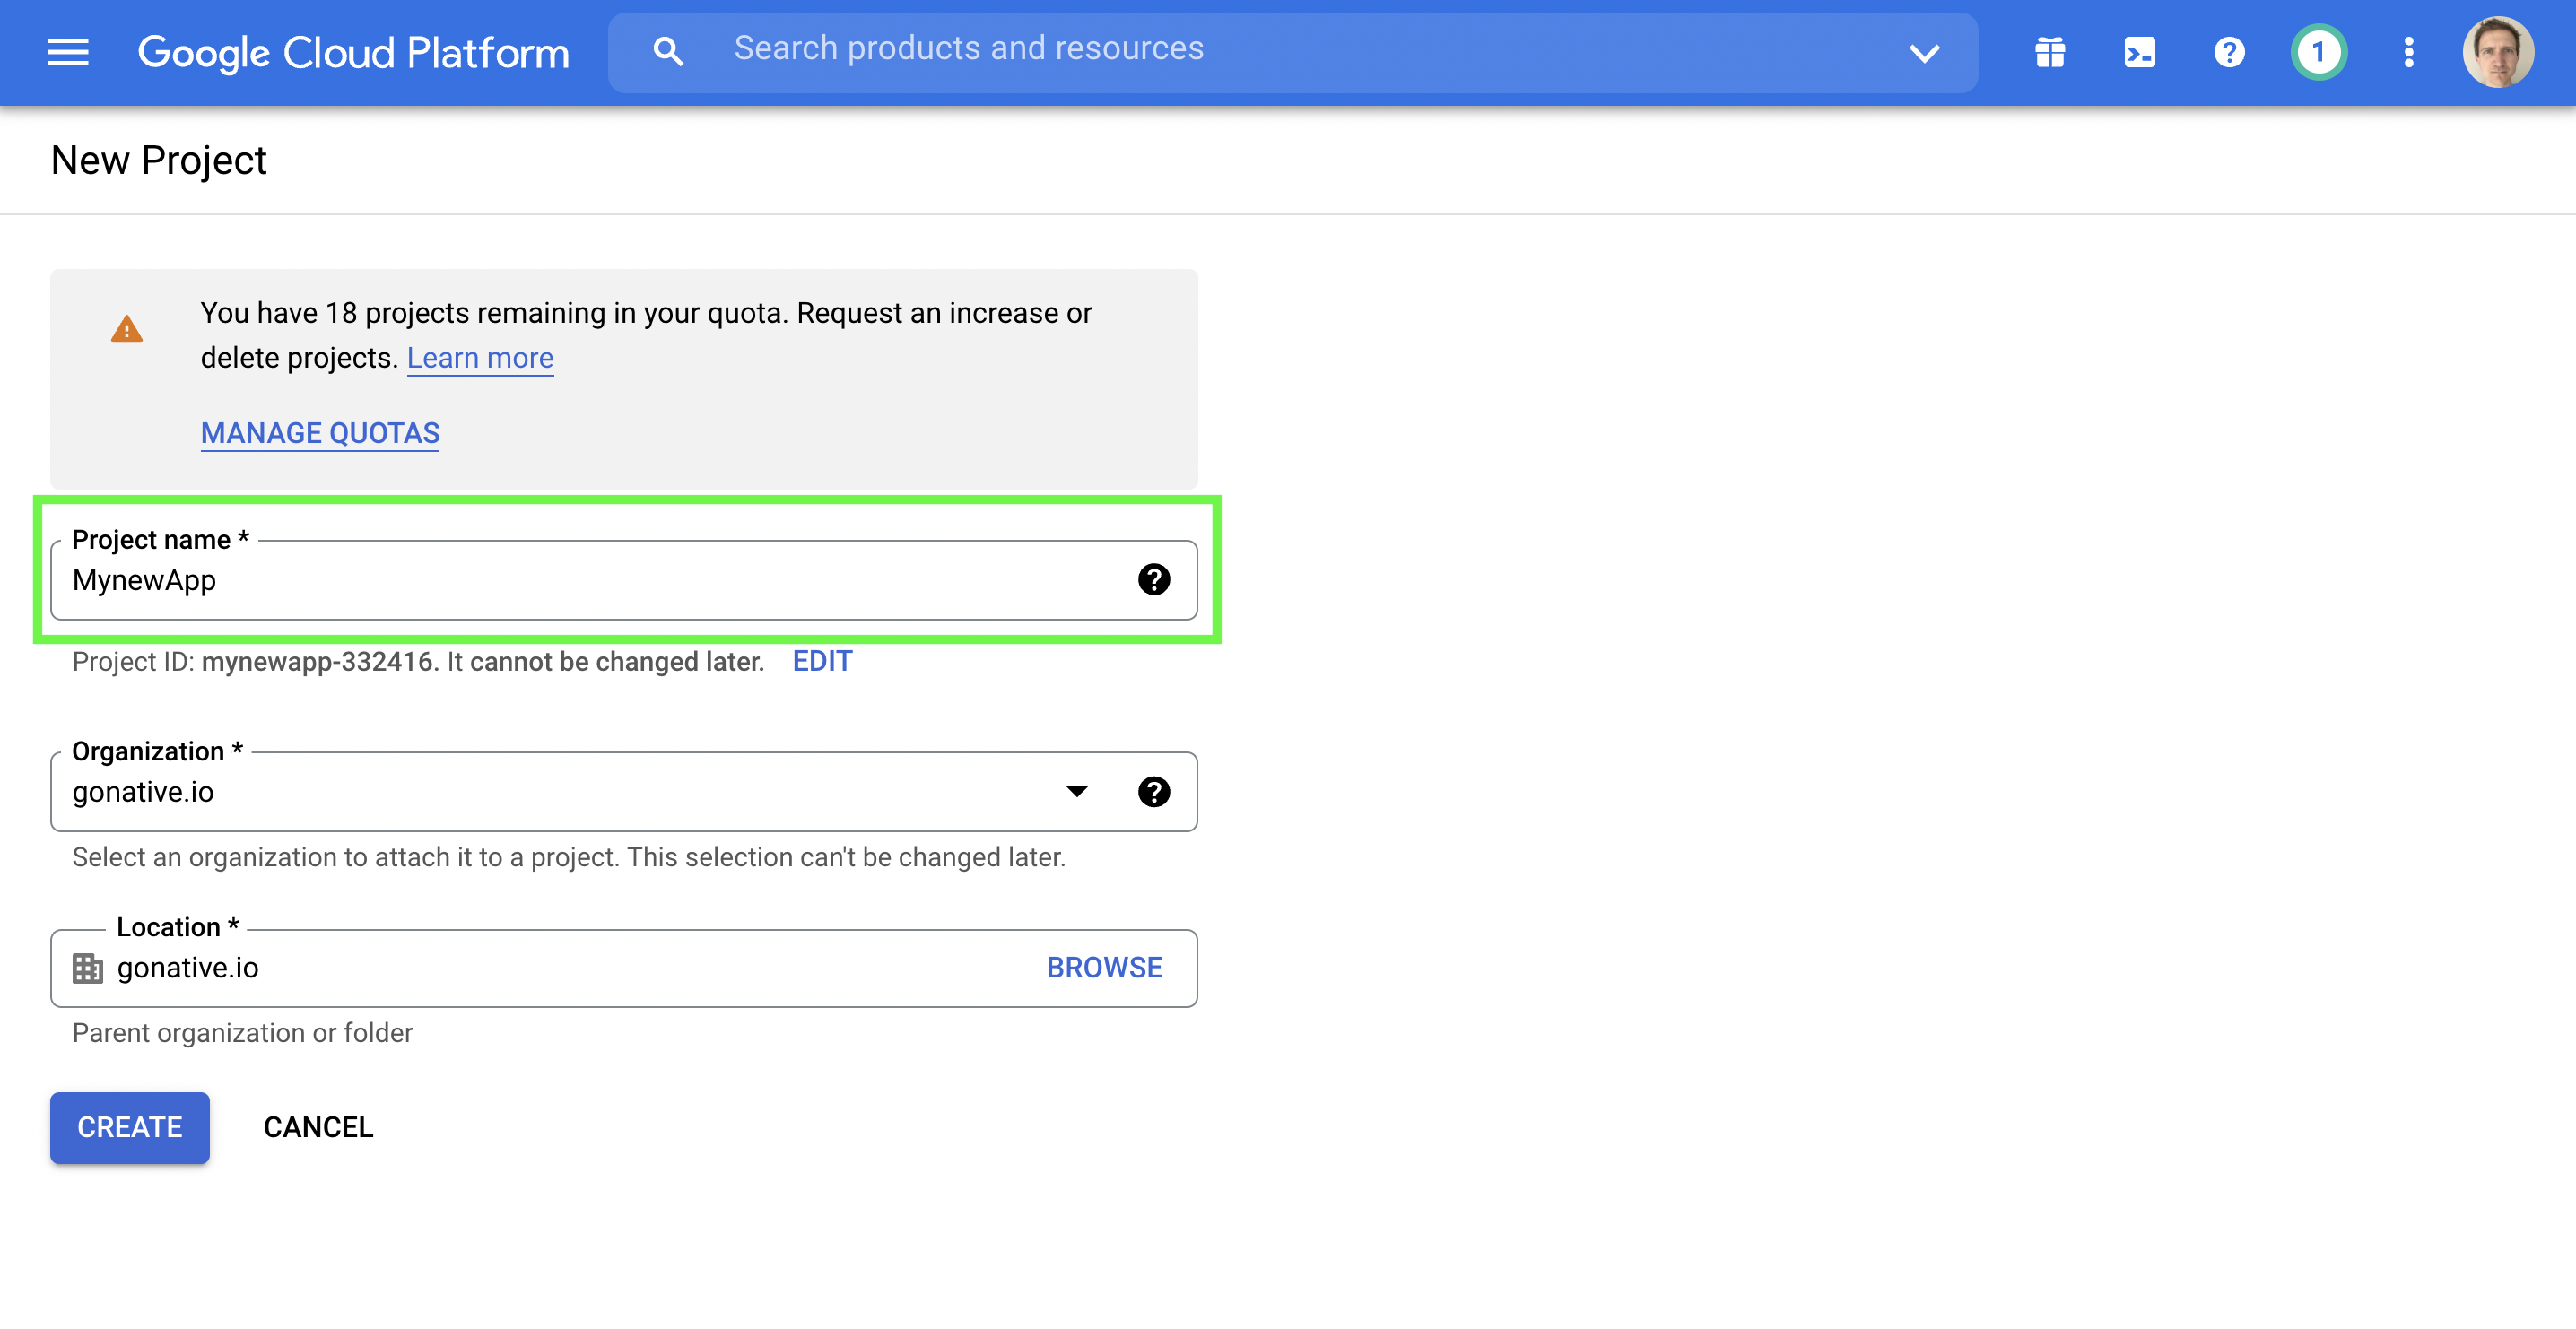
Log into your Google Platform Account and create a new project.
Step A2. Configure OAuth consent screen.
Next, we are going to configure "OAuth consent screen" in seven steps.
(i) Confirm that your current project is selected. See red box in image below.
(ii) Mouse over API and Services and then select "OAuth consent screen" as shown in green box in image below.
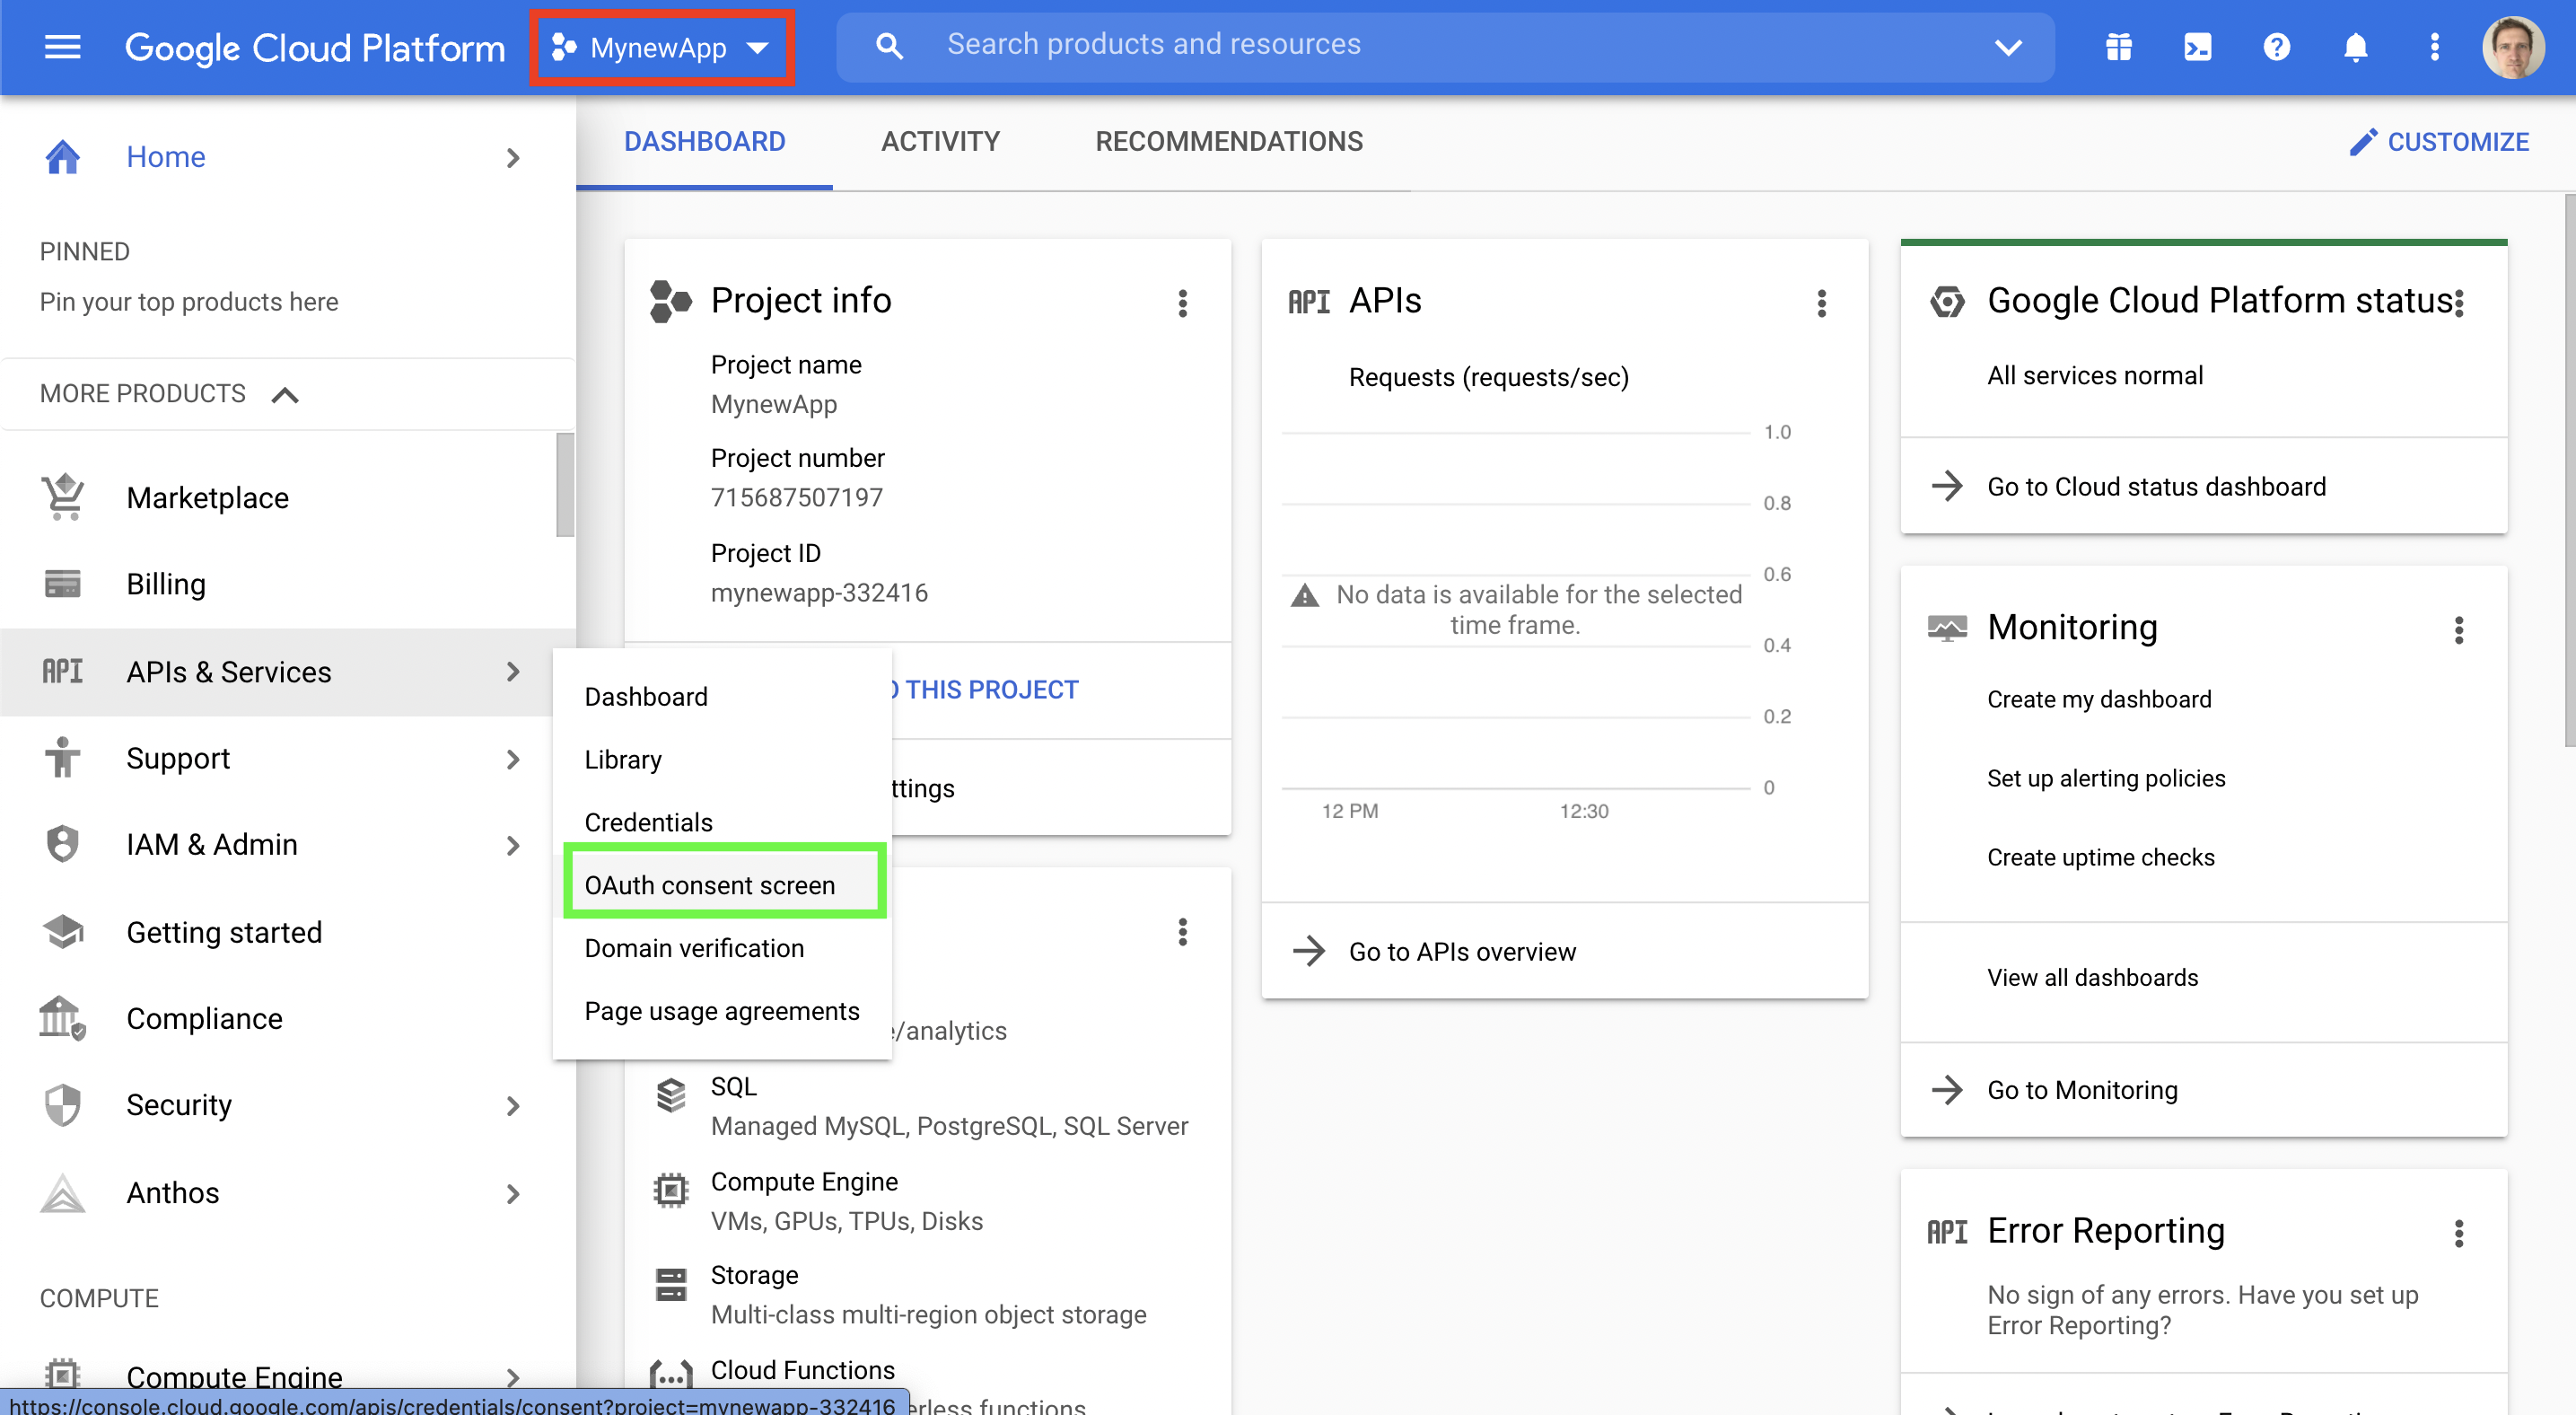
Configure user type.
(iii) Choose whether the user type should be internal or external. Then click "Create"
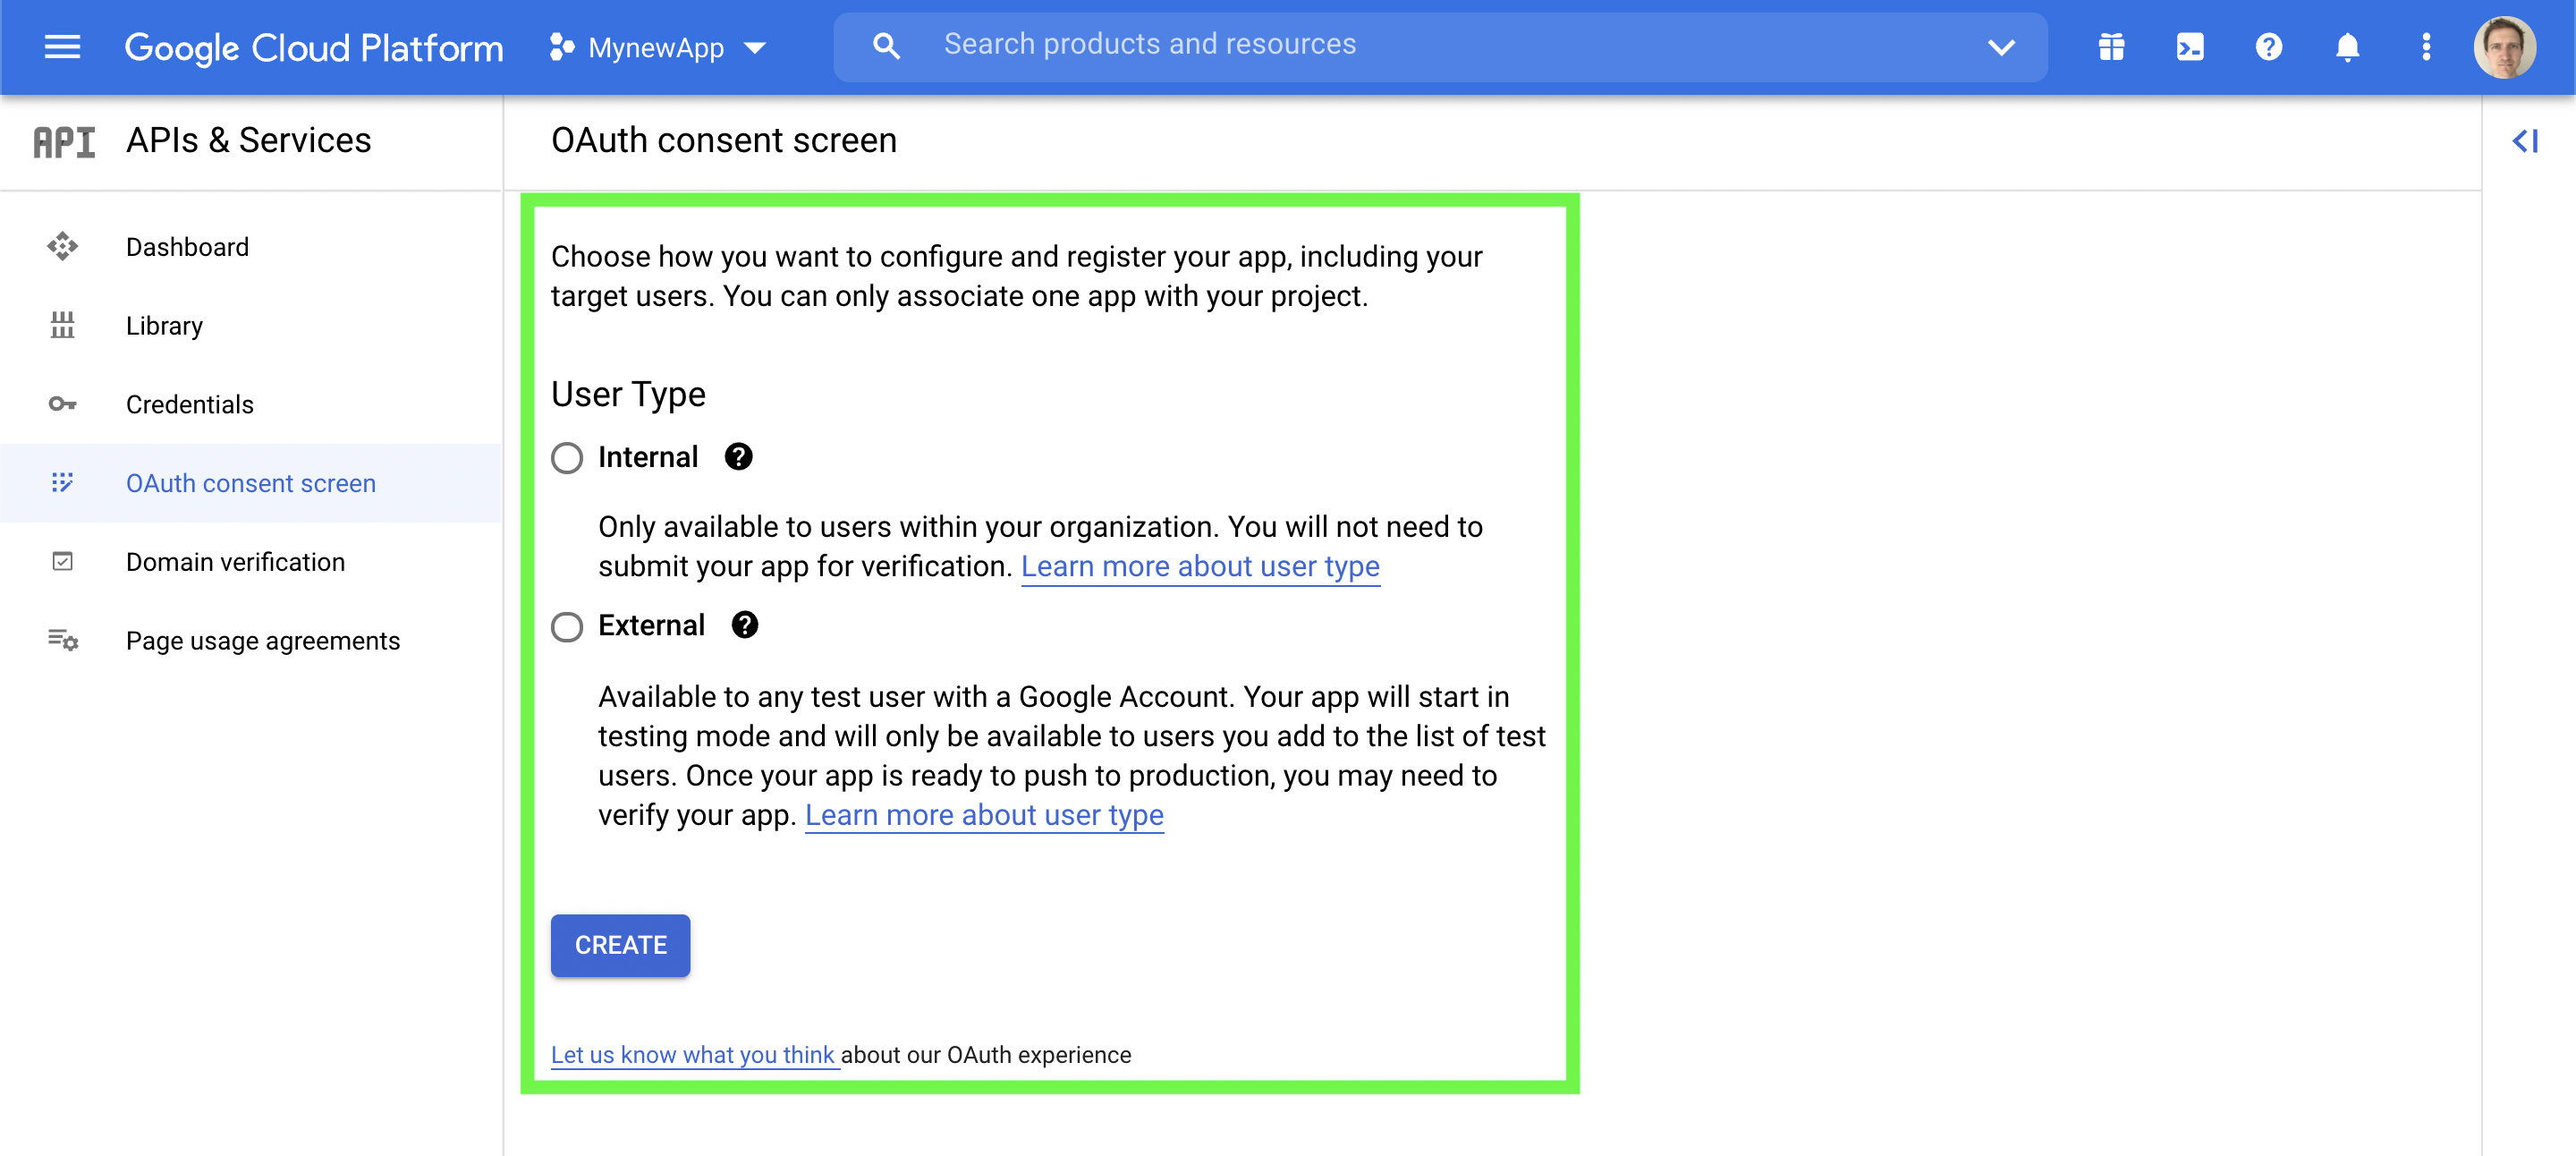
Choose internal or external. Then click "Create"
(iv) Continuing with OAuth consent screen but now editing app registration. As indicated in the green boxes below add your app name, select a support email from the pull down menu, and add an app logo. Notice the small print below the App logo field.
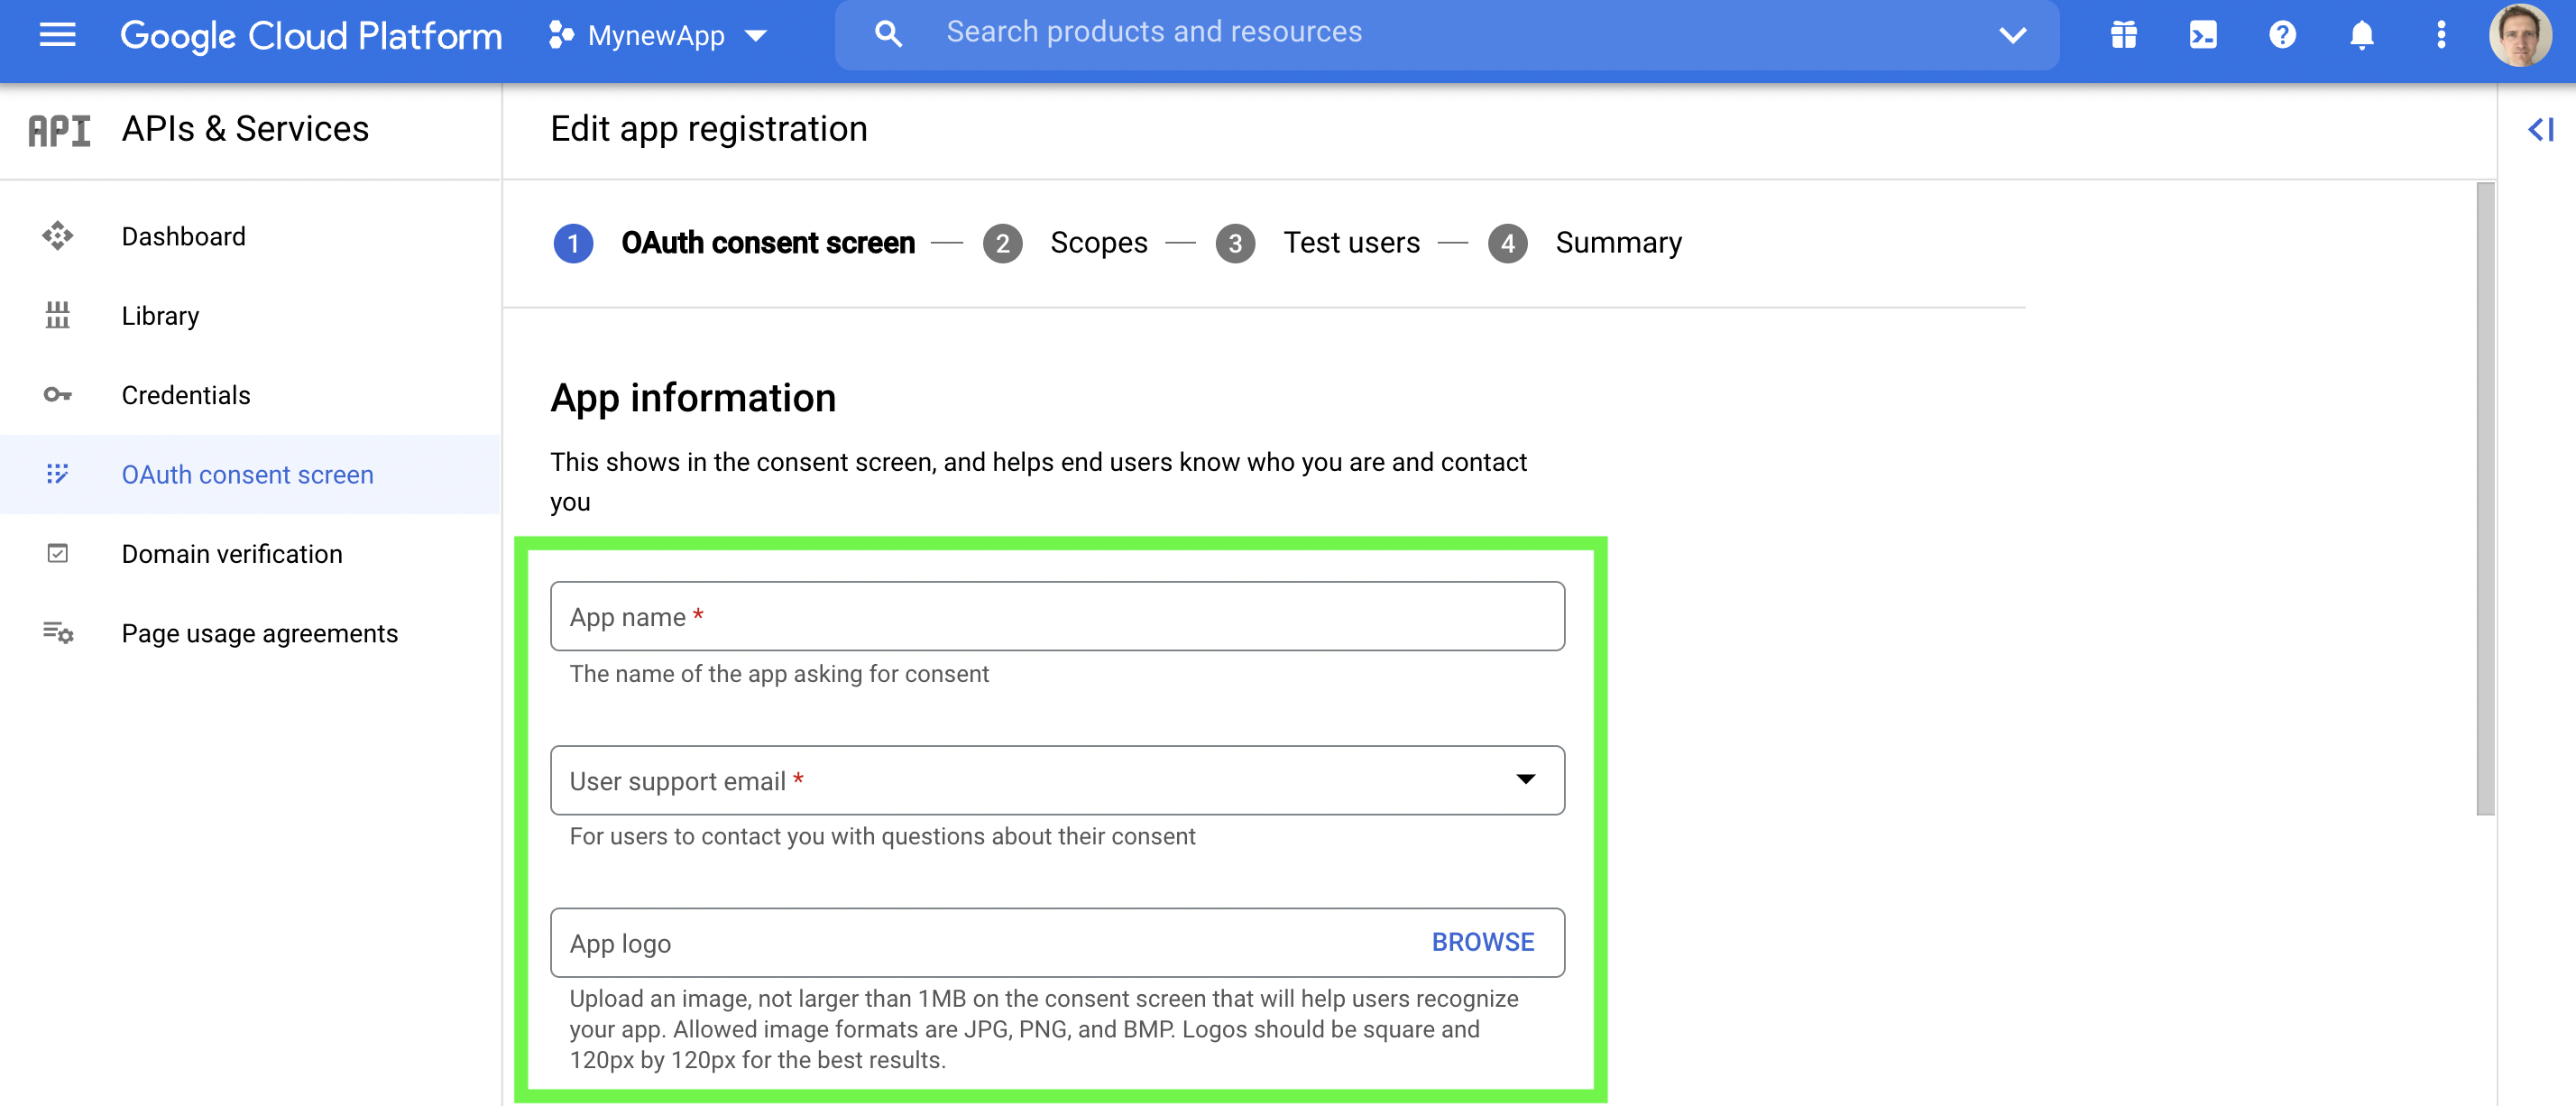
Edit app registration information.
(v) Enter your App URL and its domain as indicated in the first and second green box, respectively.
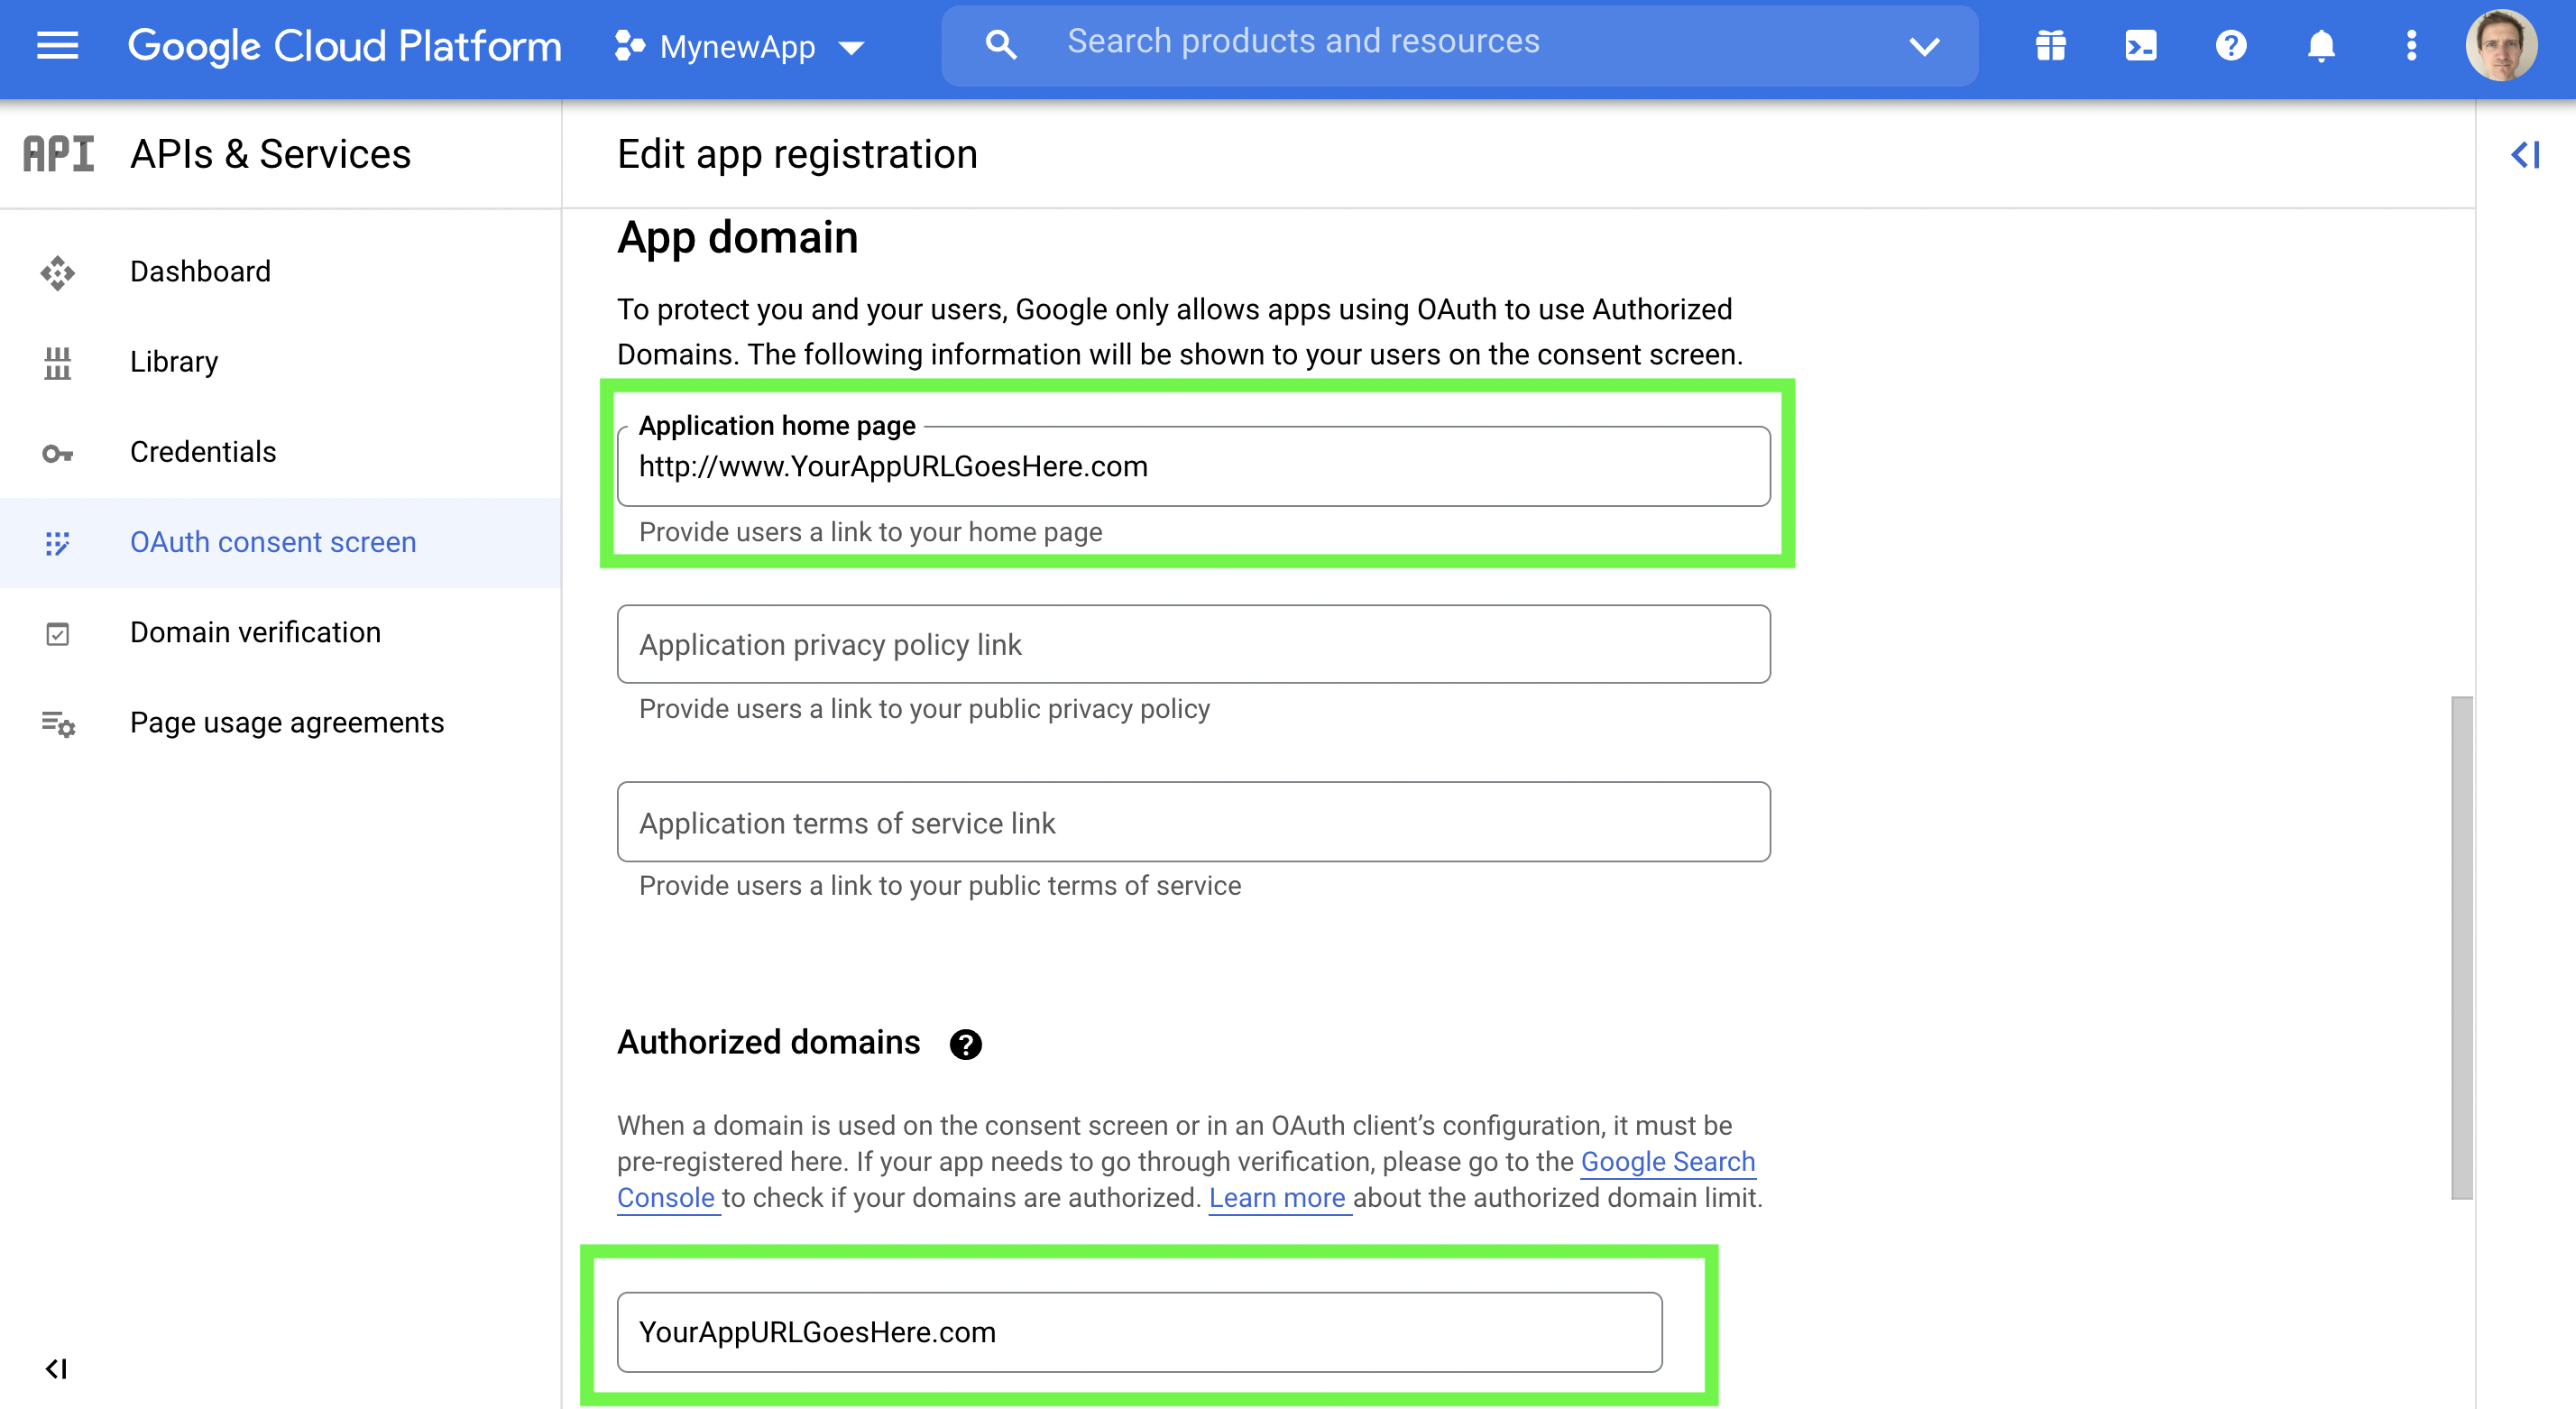
Enter your App URL and domain
(vi) Enter the developer's email address. Click Save and continue.
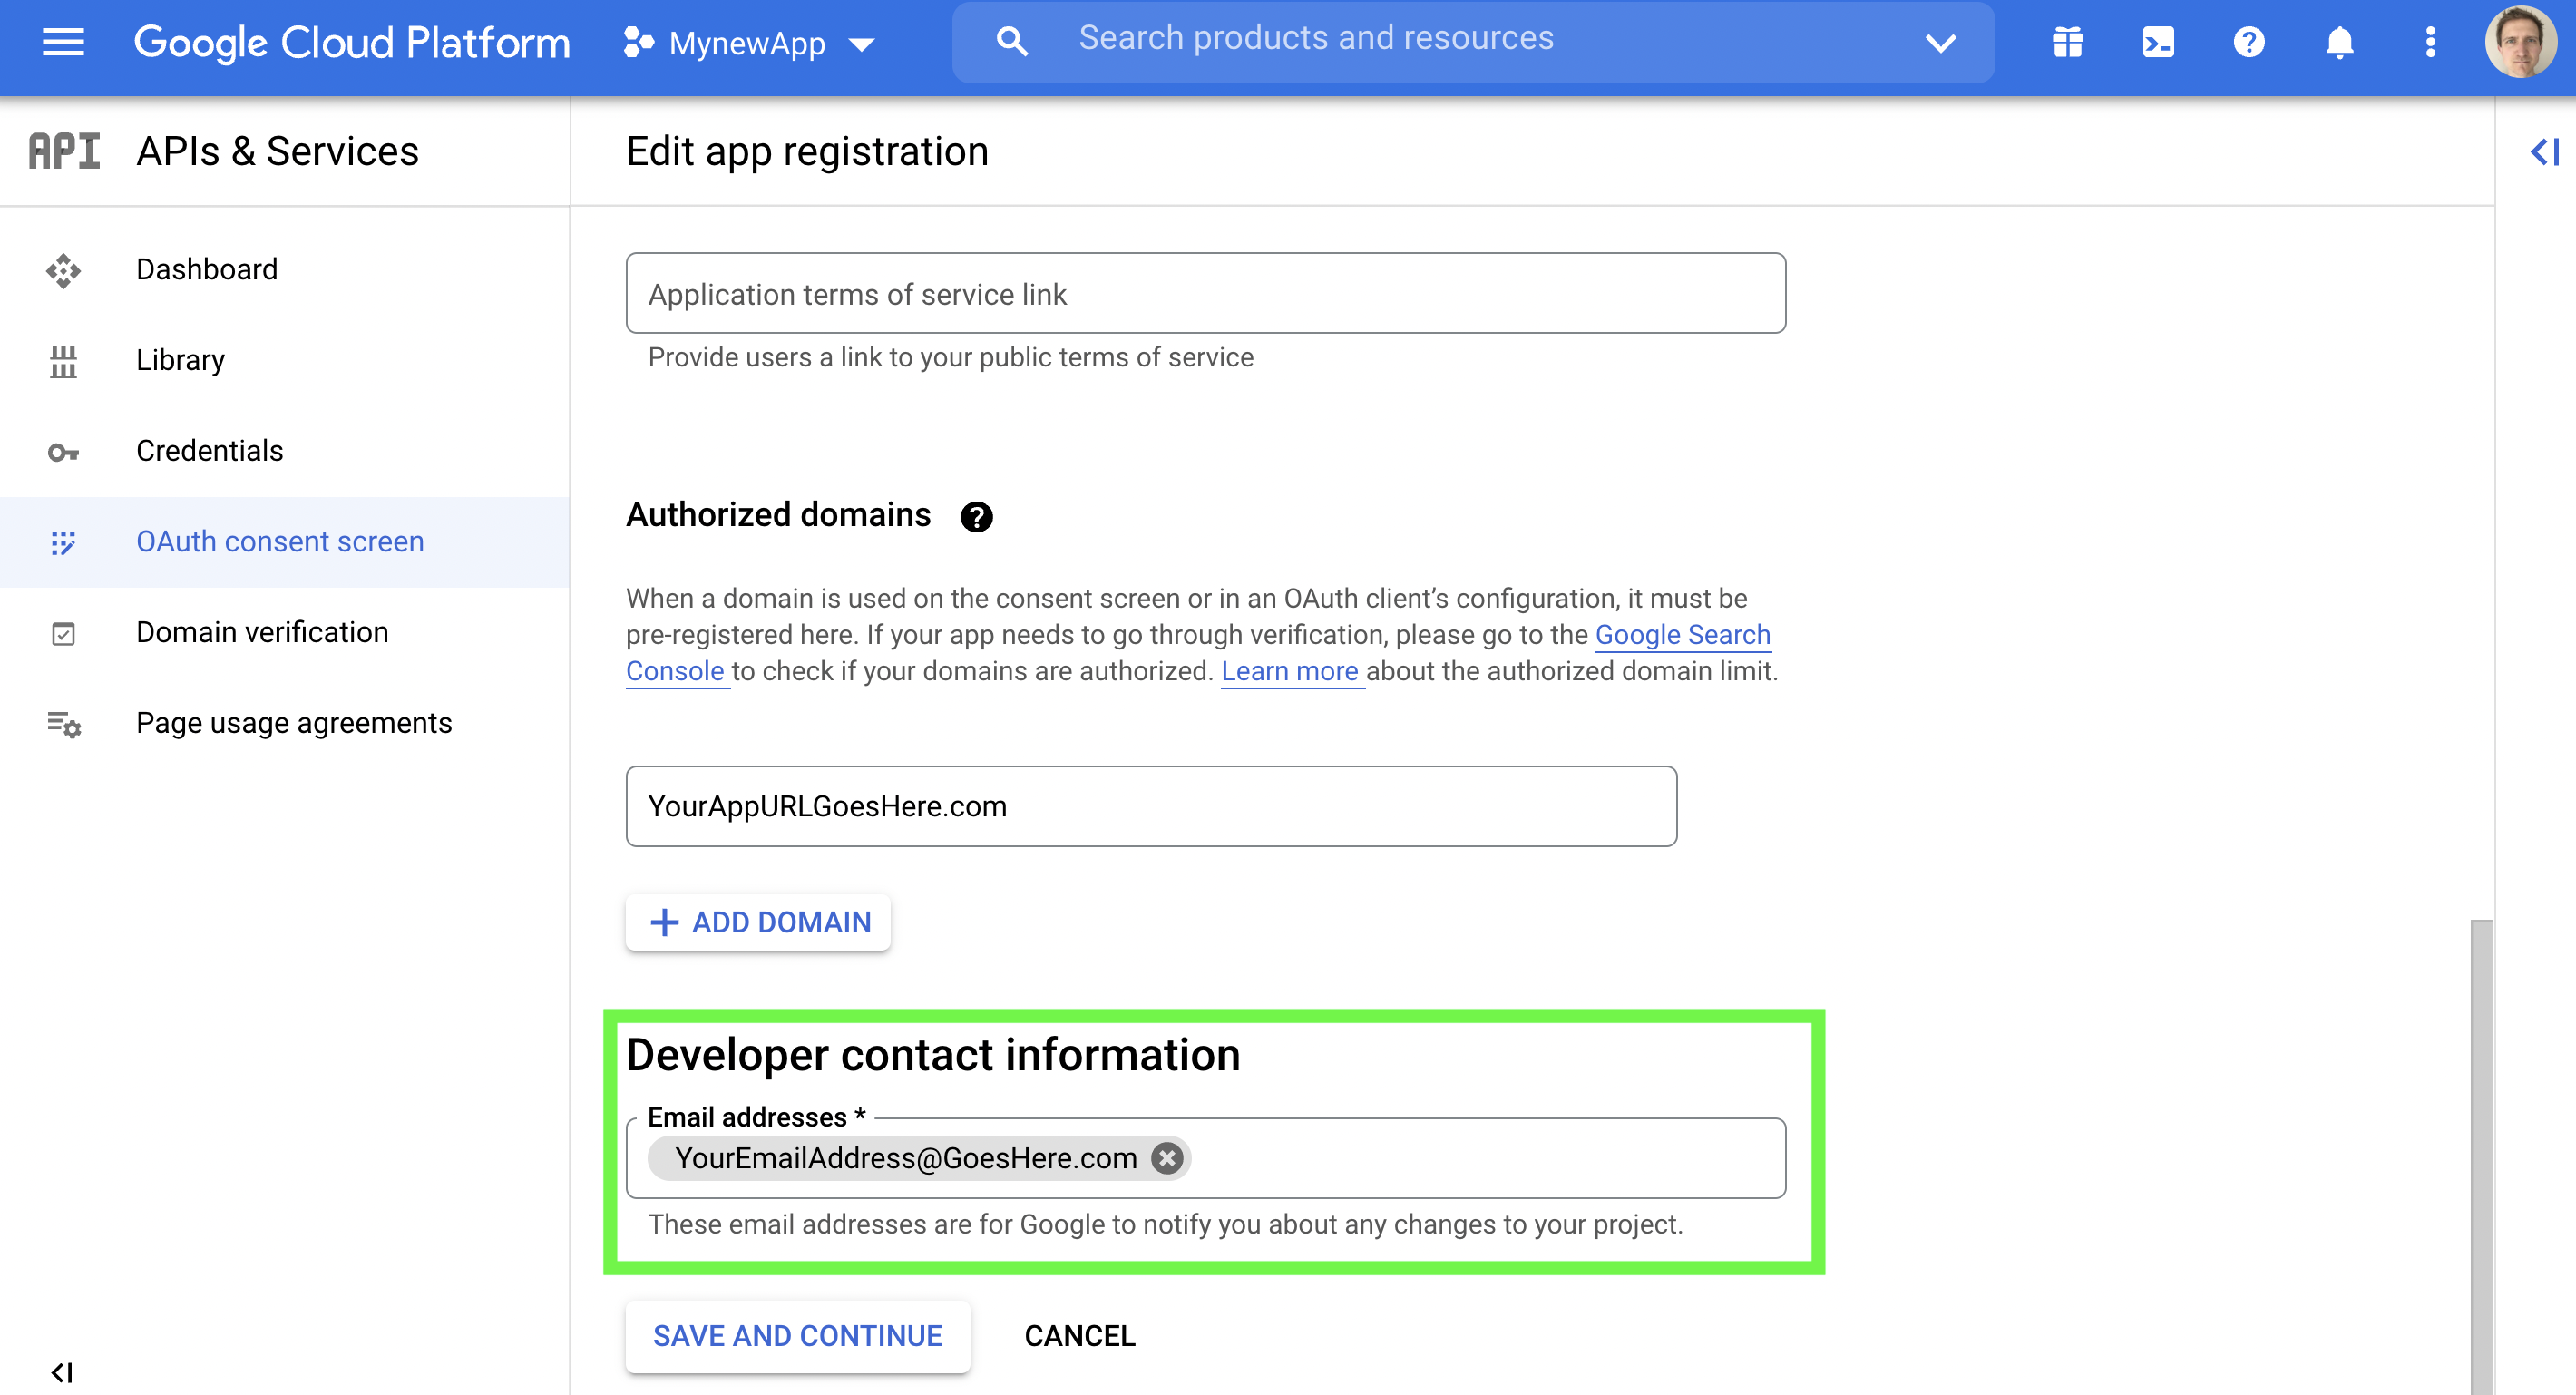
Enter the developer's email address
(vii) Then Save and continue for each of scopes, test users, and summary. Return to dashboard by clicking "Back to dashboard" at the bottom of the summary window.
B. iOS Configuration
Skip to Android App Configuration
Version
We currently use Google Sign-in v6.2.4 for iOS that does not require Web Client ID for configuration. We will soon be updating to v7.0.0 that will need both iOS and Web client IDs for authentication.
Required Parameters
You should make note of the following parameters to activate Google Login within your Median App.
- iOS Client ID (found in Step B2)
- URL scheme (found in Step B3)
Step B1. Configure your OAuth Client ID.
For the next step, we're going to leave the Google Cloud Platform and visit developers.google.com to create an OAuth client ID. Sign in to your account
(i) Click the blue button that says "Create an OAuth client ID"
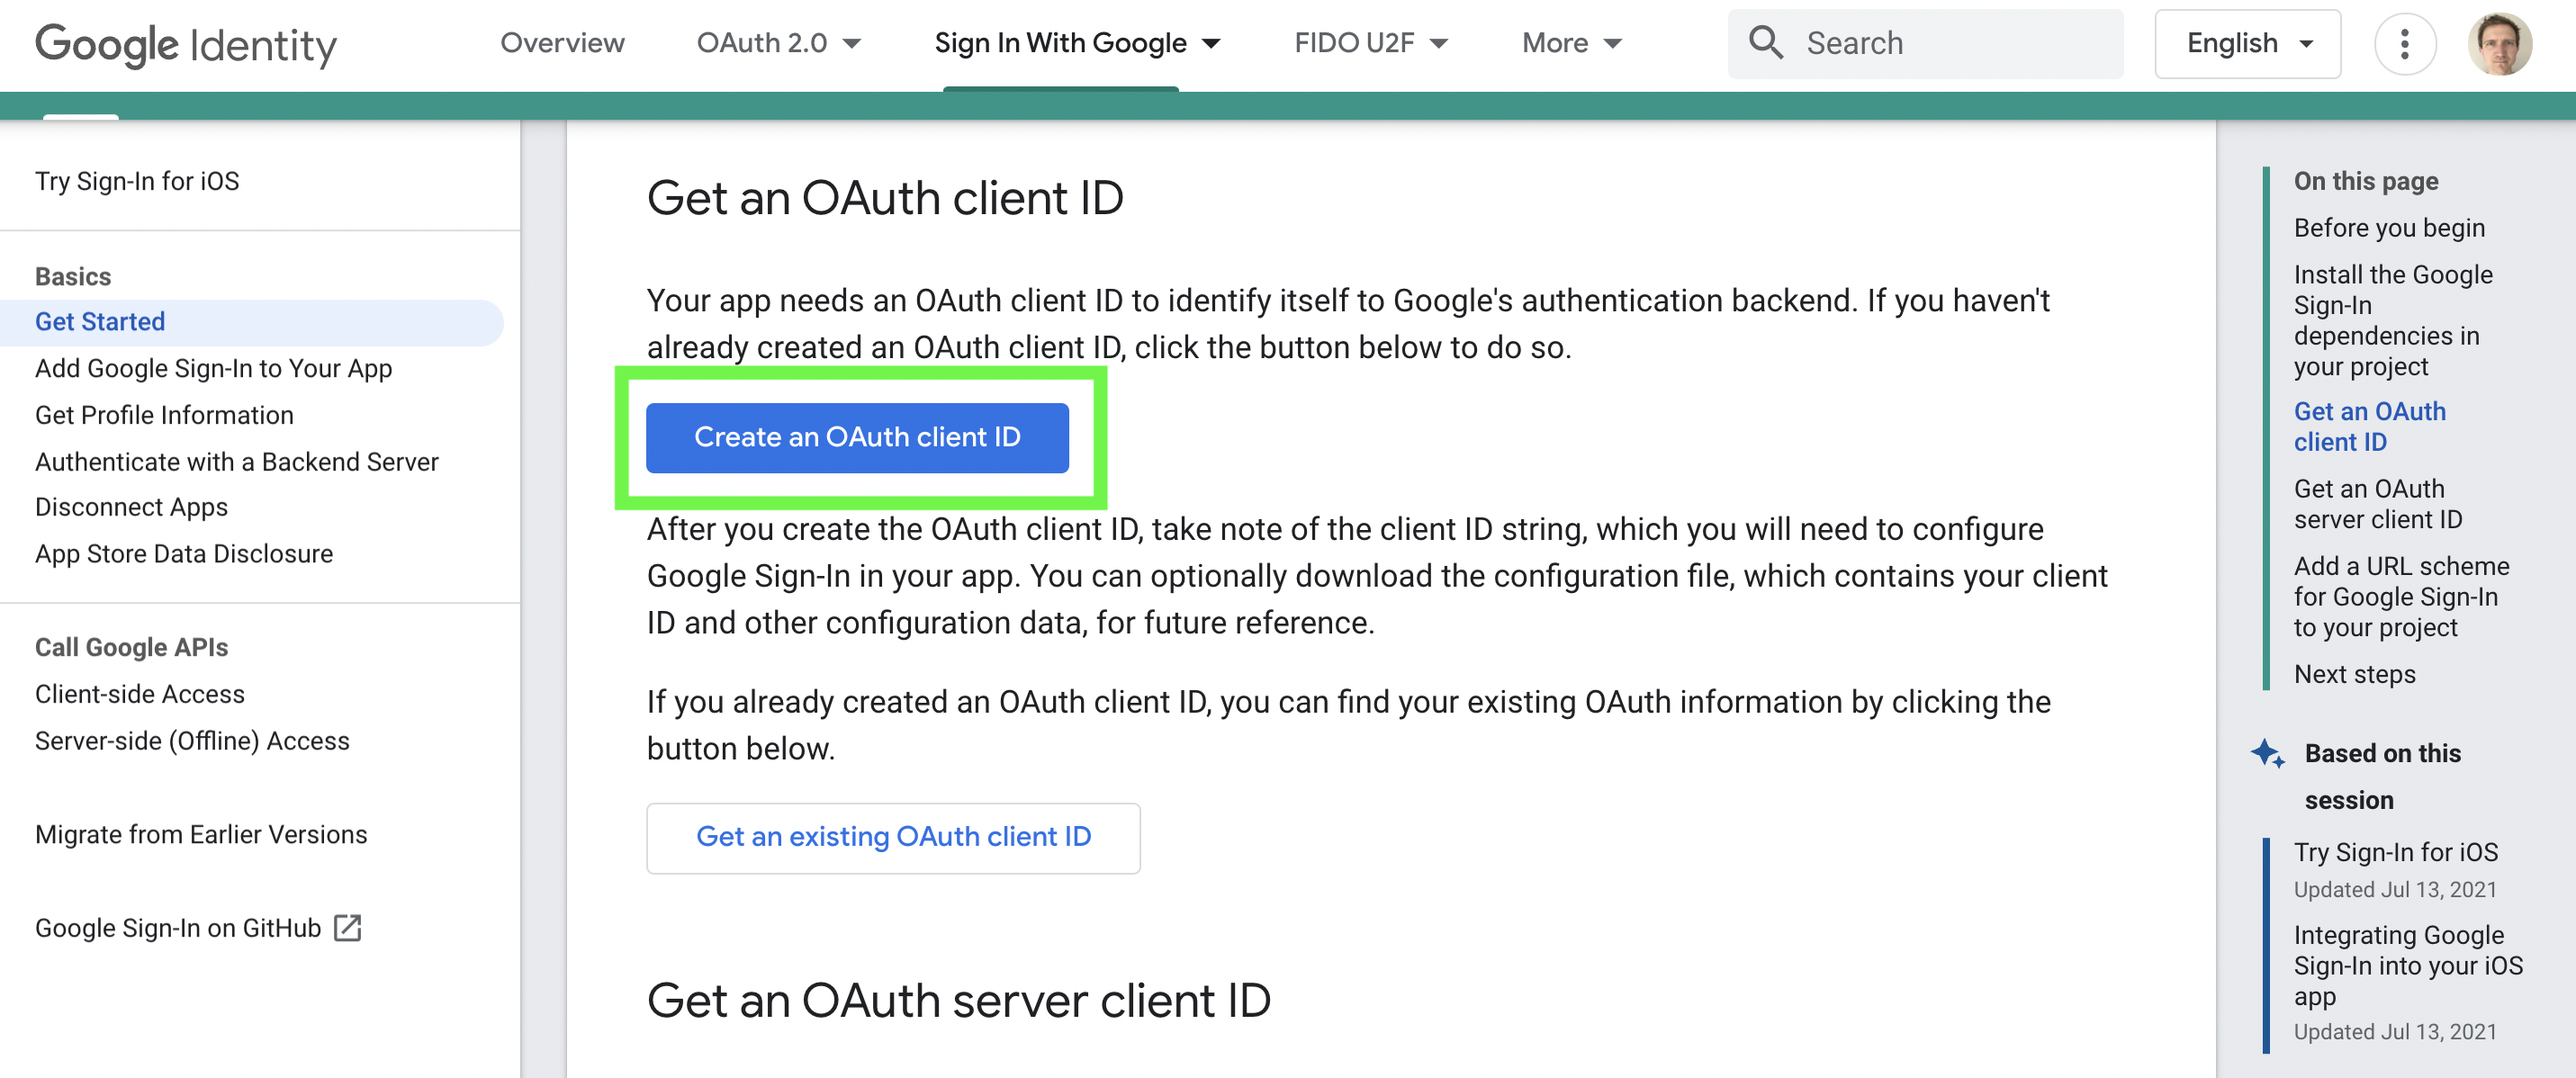
Click "Create an OAuth client ID"
(ii) When prompted, select your project and click "Next".
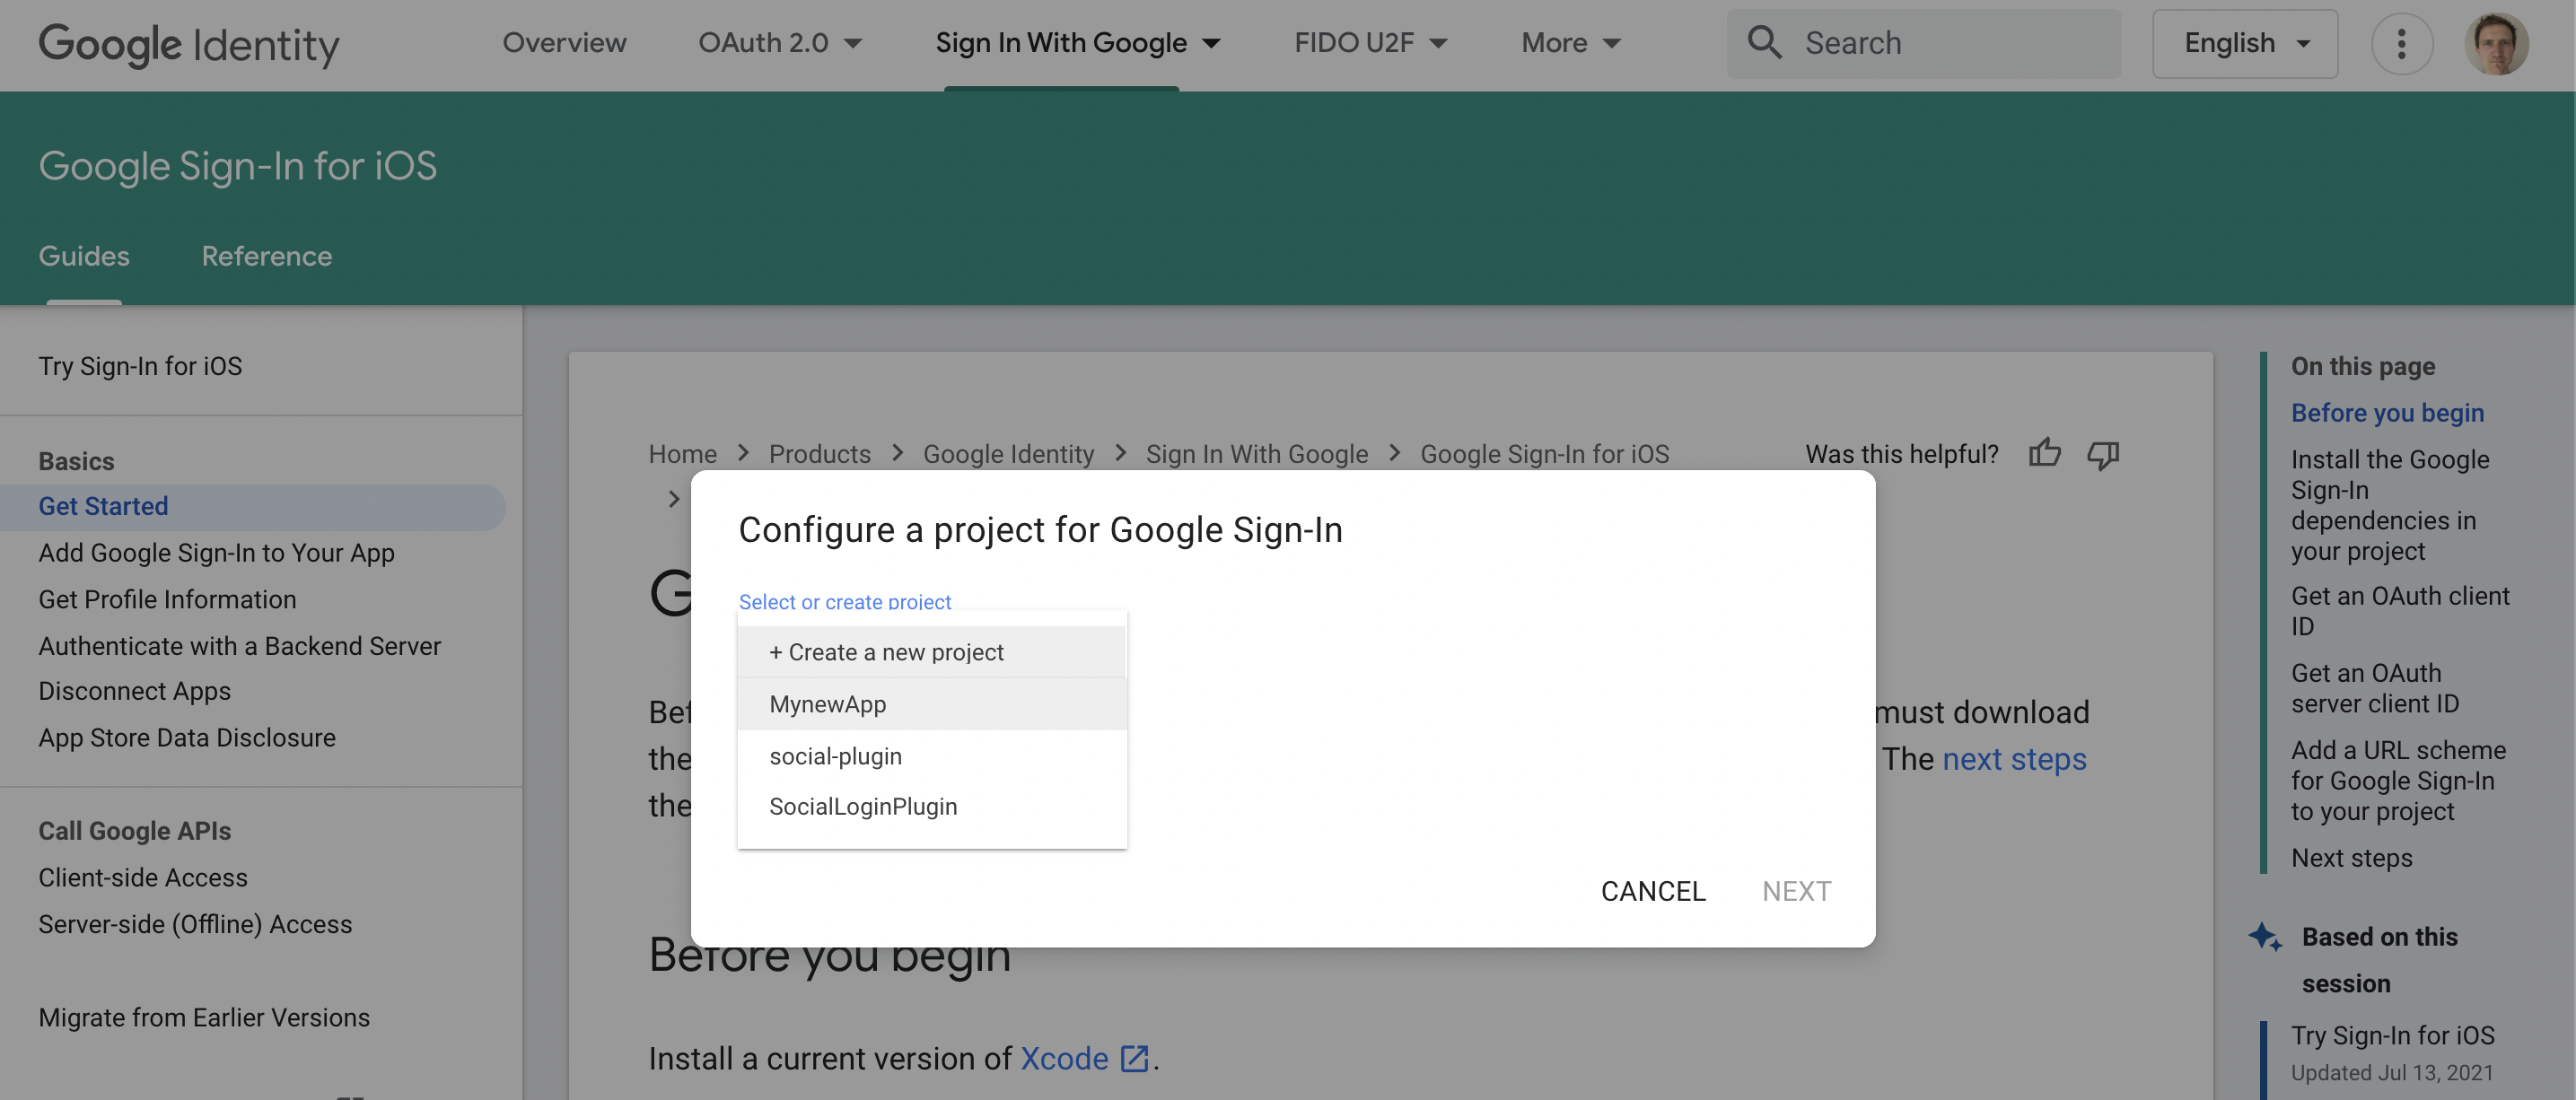
Select your project and click "Next".
(iii) Select iOS and add your Bundle ID as shown in the green boxes, respectively. Then click "Create".
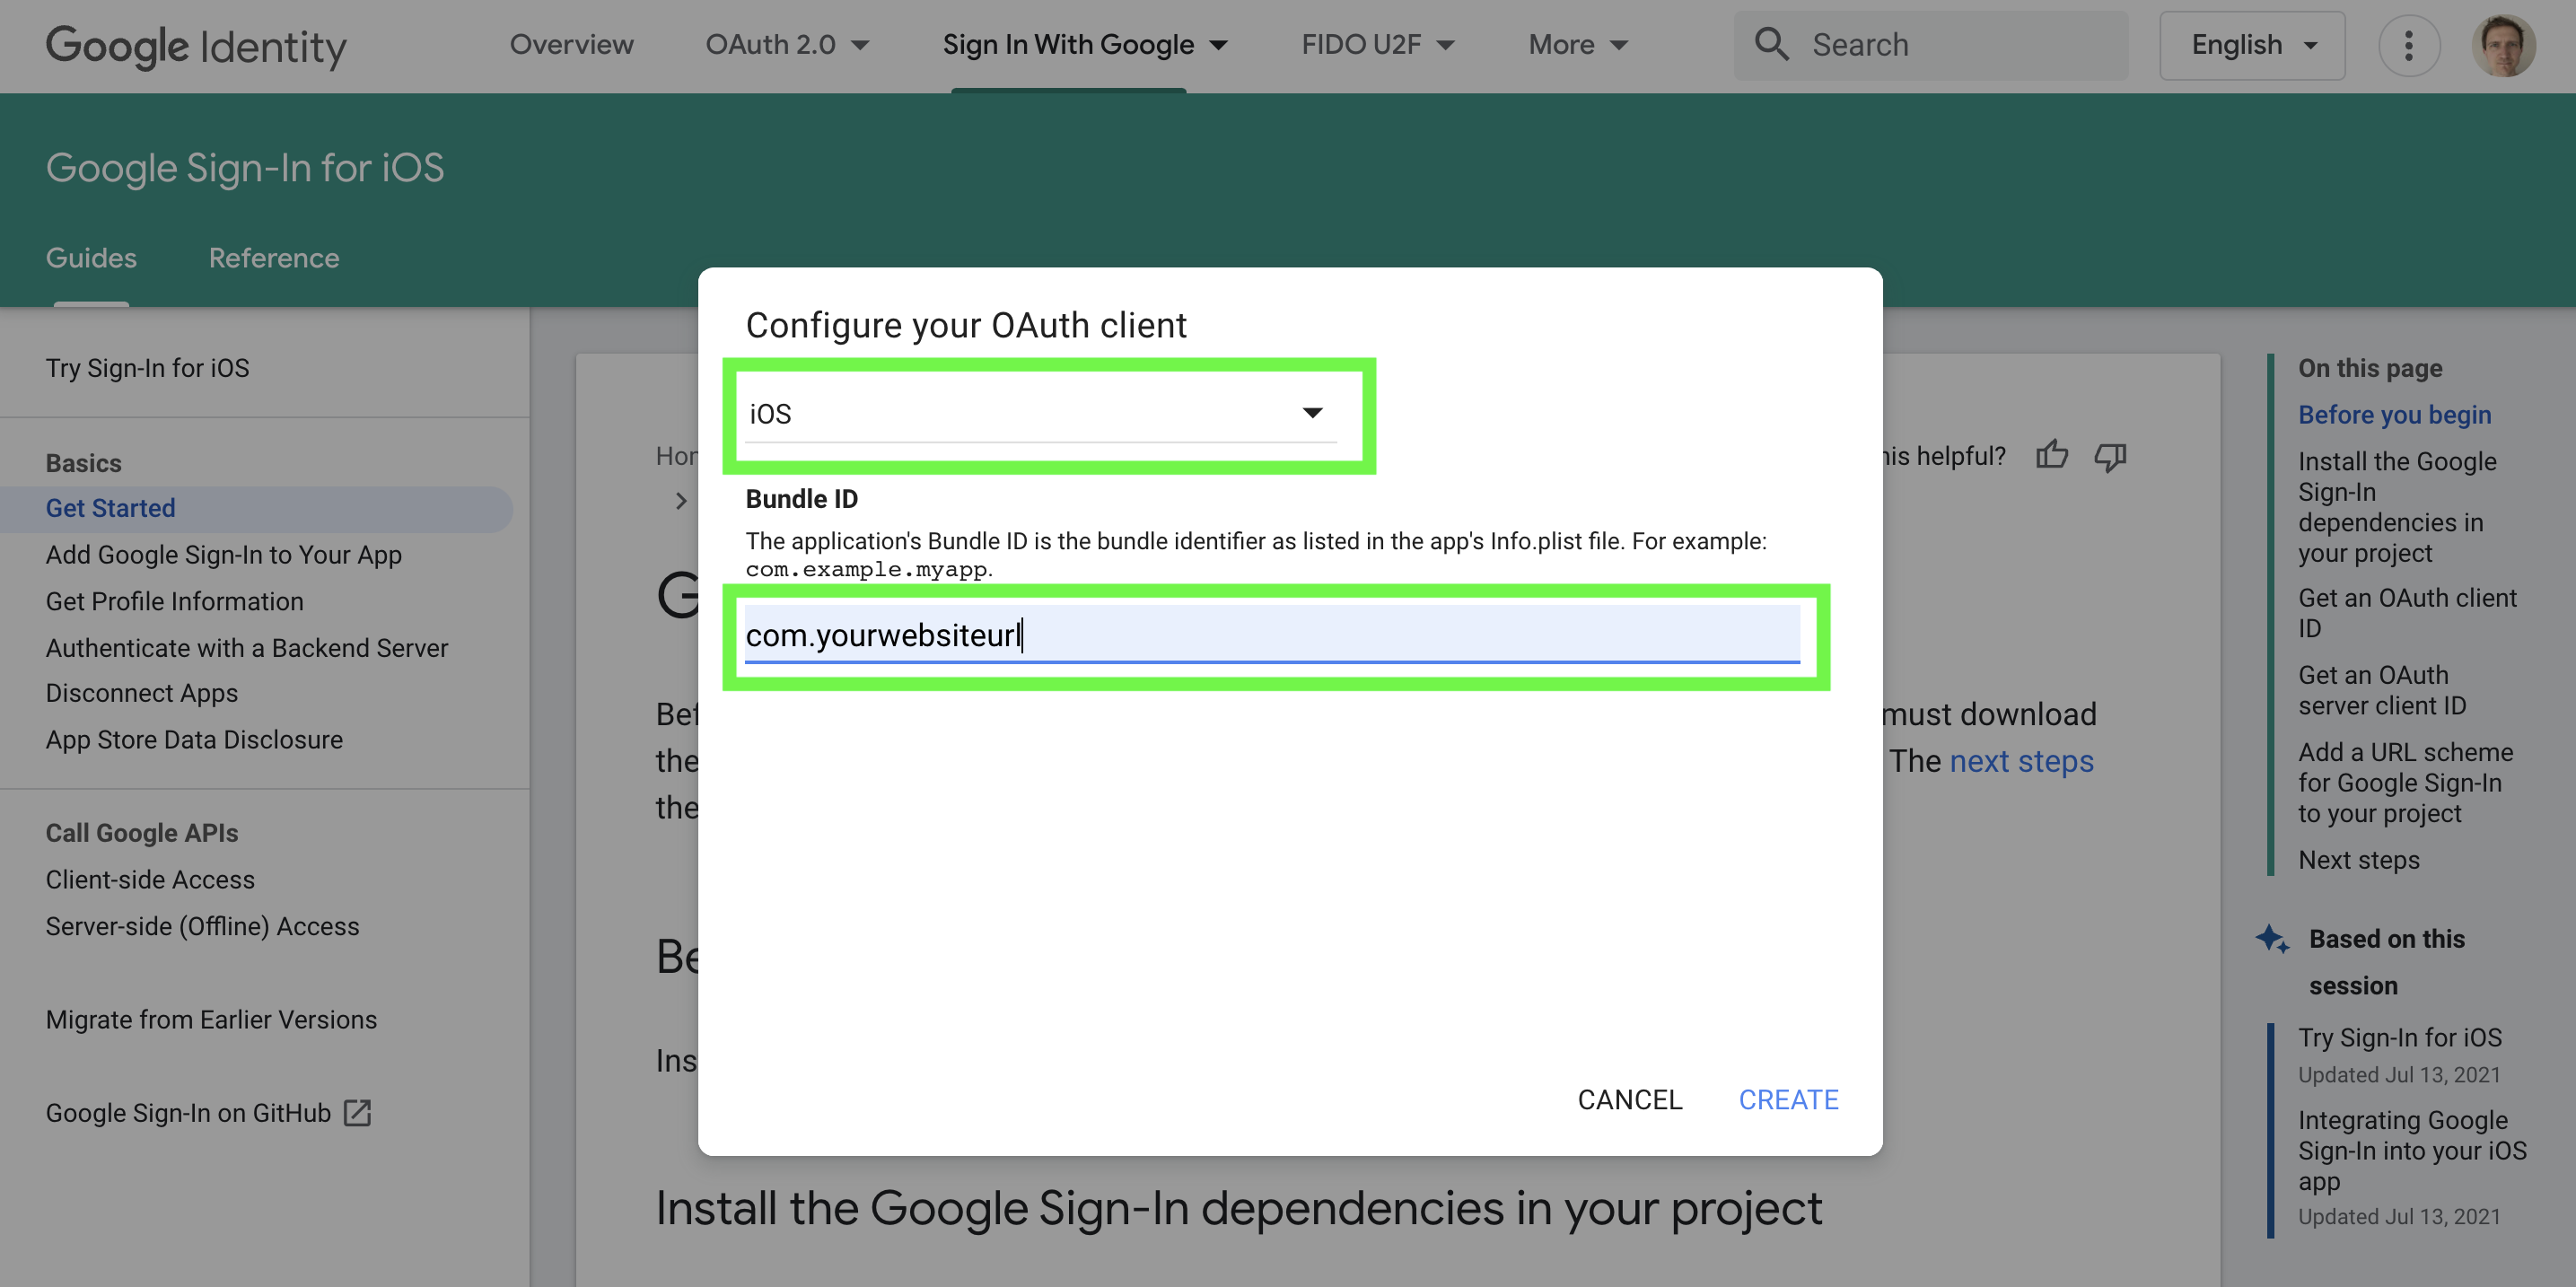
Select iOS and add your Bundle ID
Step B2. Record the client ID and download the configuration file.
Add iOS Client ID to your Median app.
Record the iOS client ID by using the copy to clipboard button and add to the Social Login configuration for your Median iOS app.
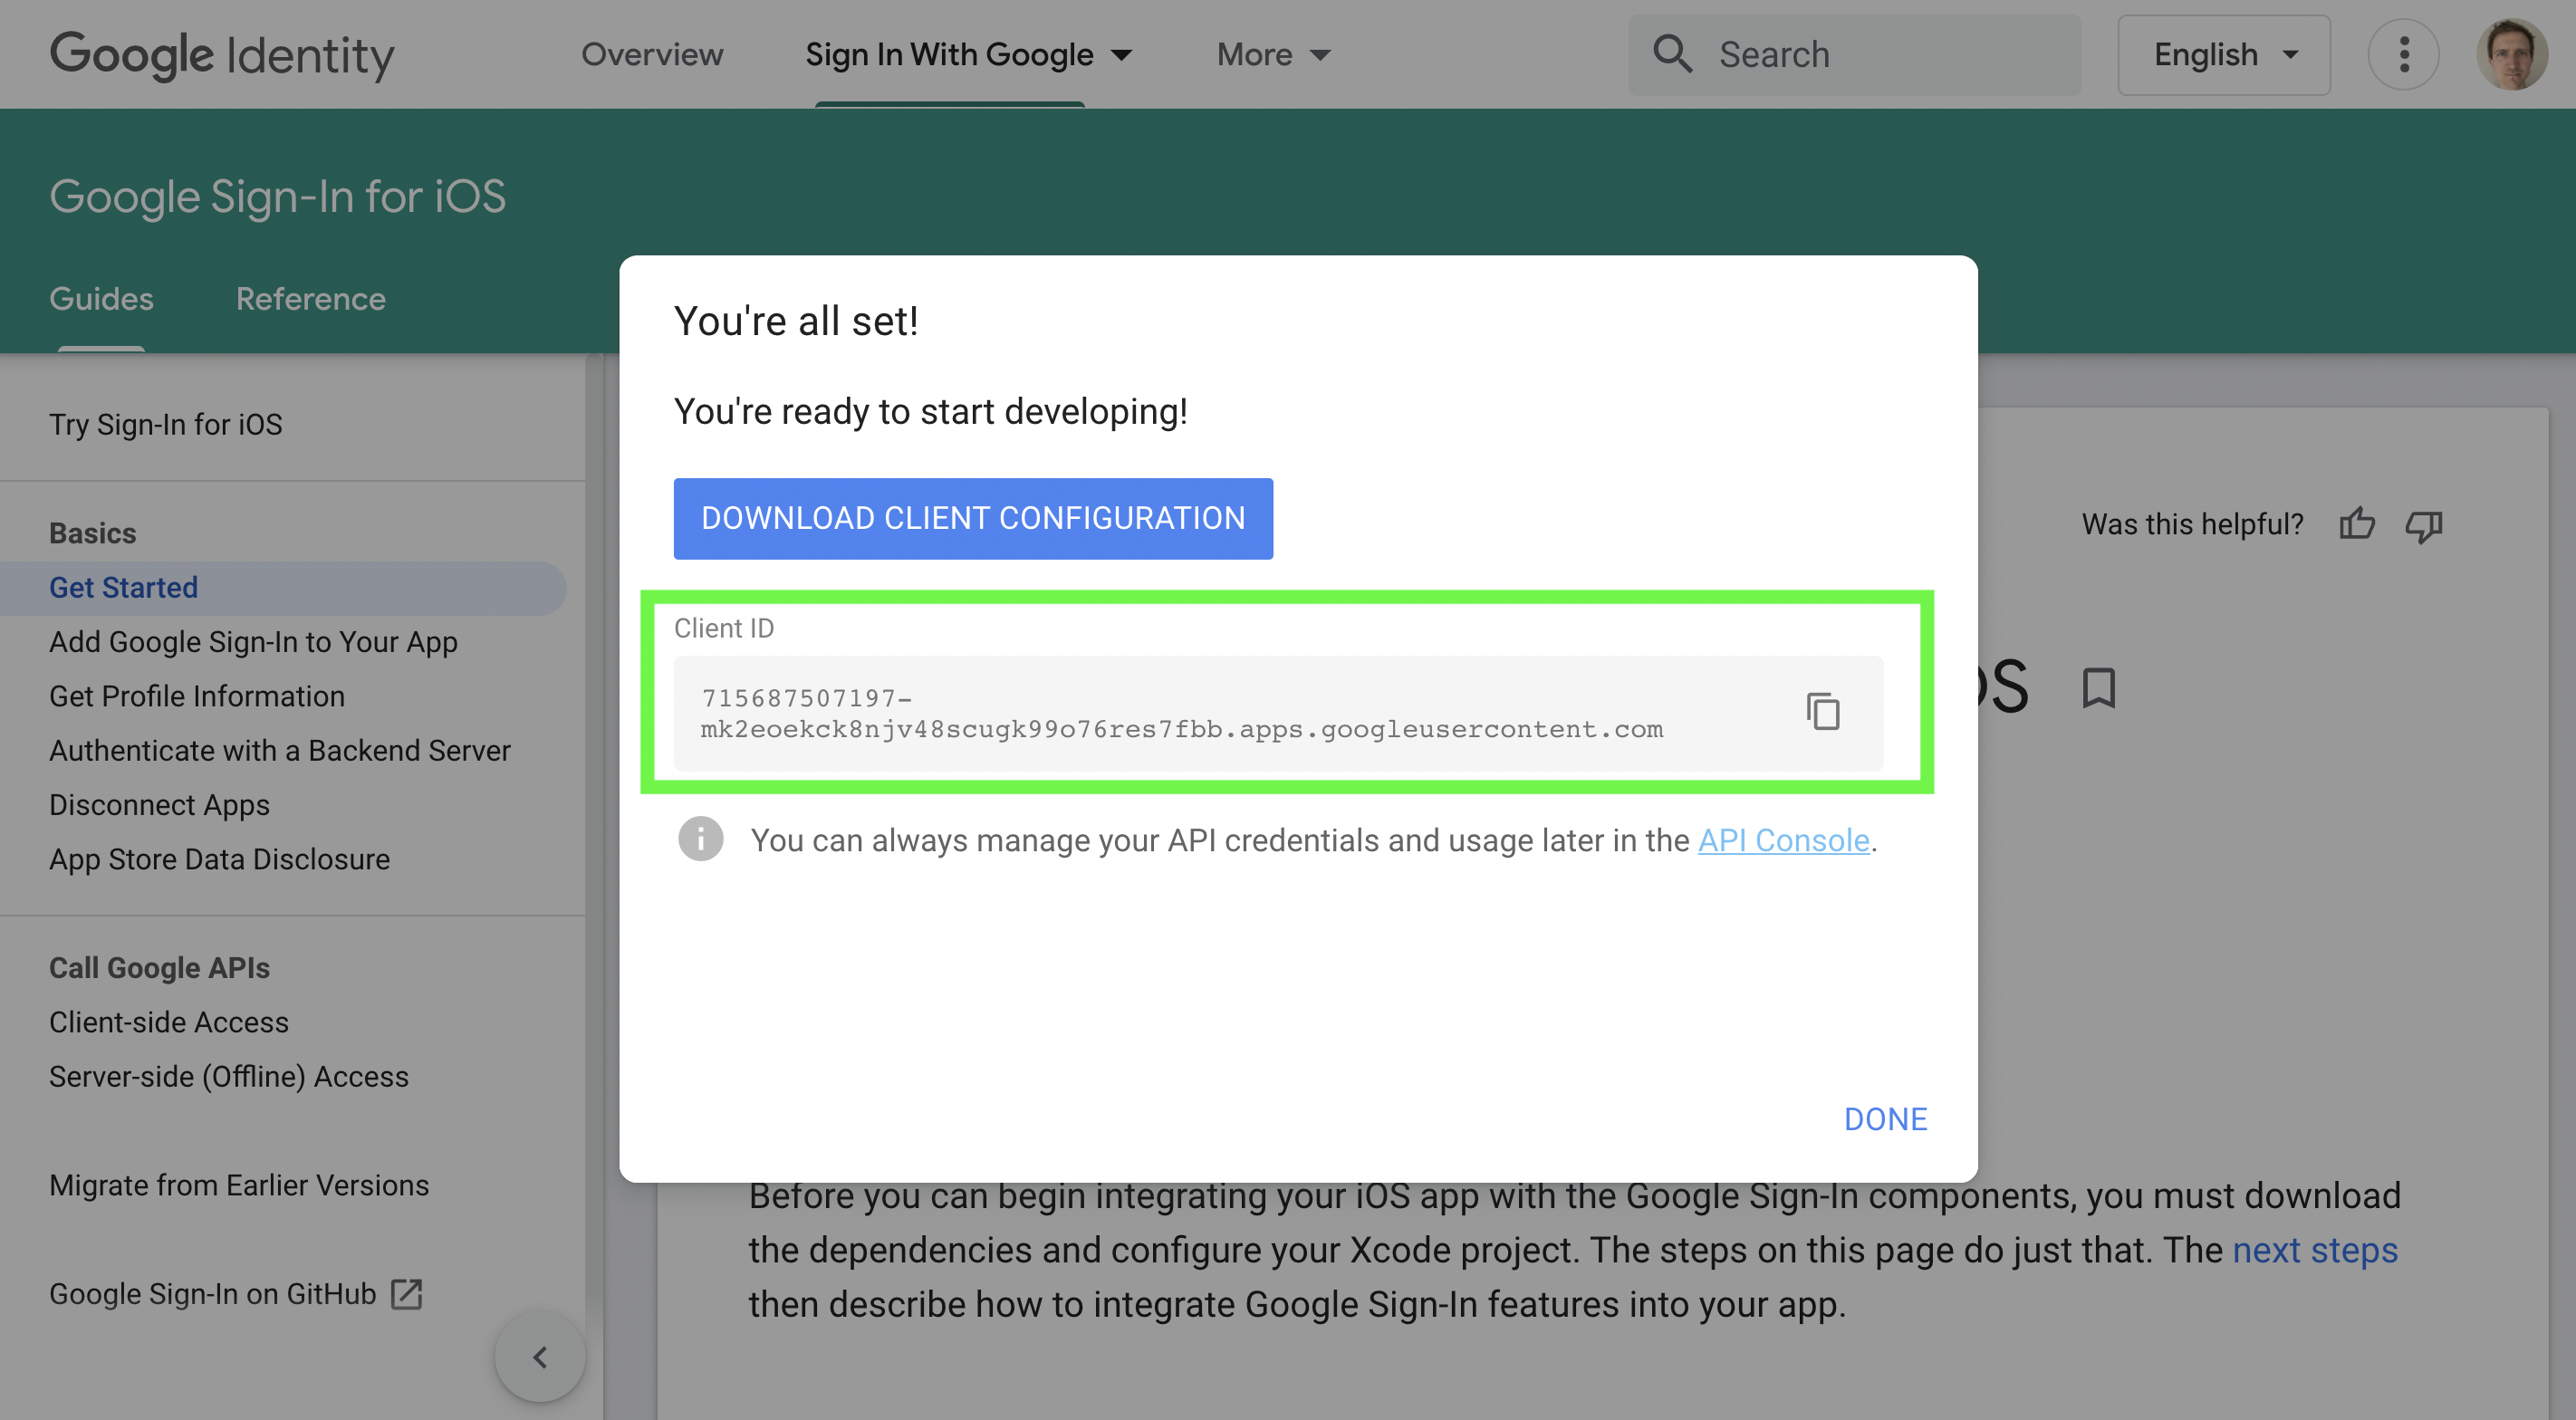
Record the client ID and download the configuration file.
Step B3. Create a URL Scheme.
Important Information
Generate a URL Scheme from the client ID manually. The URL Scheme will be the reversed client ID. Follow the example below to create your own:
Example:
If your iOS client ID is:
843254985318-c1q9b8809pul43h3q5u1q5t6ki0l10en.apps.googleusercontent.com
then your iOS URL Scheme is:
com.googleusercontent.apps.843254985318-c1q9b8809pul43h3q5u1q5t6ki0l10en
Step B4. Add JavaScript origins and redirect URIs
Go to your API credentials. Find and click the “Web client (Auto-created for Google Sign-in)” in the name column from the OAuth 2.0 client IDs table.
As shown in the green box below, click the "ADD URI" button and in the url field that appears, add the authorized JavaScript origins. Do the same for your redirect URIs then click save.
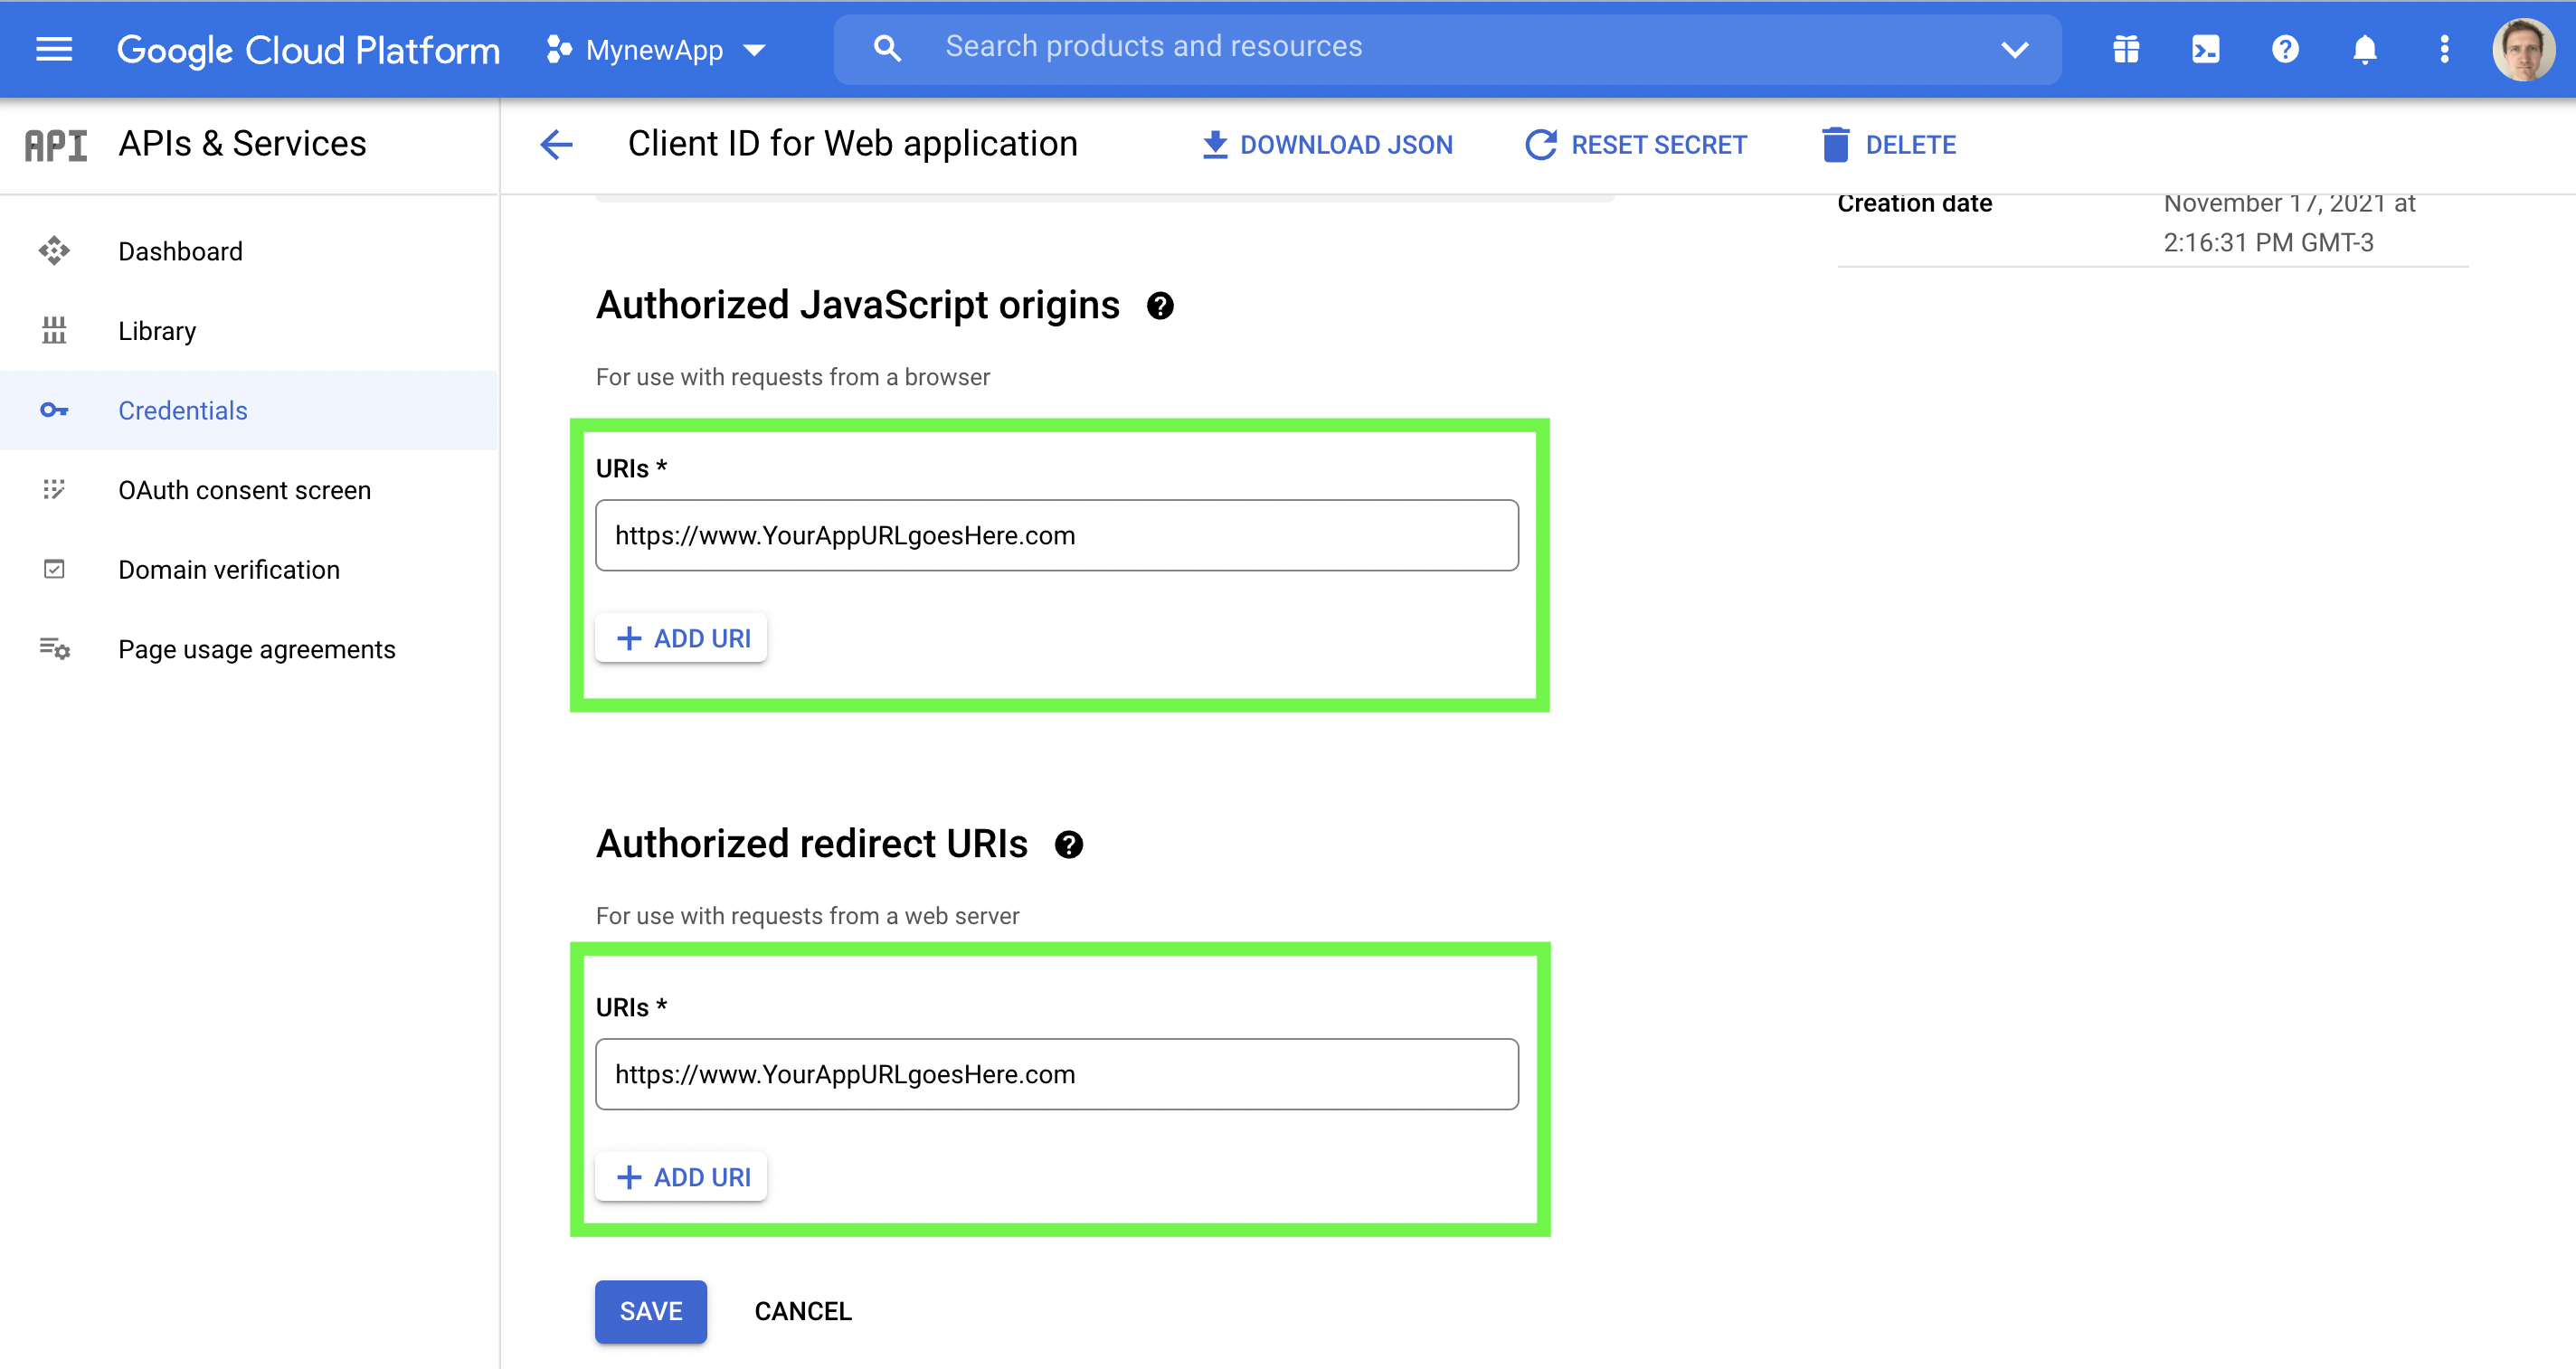
Adding javascript origins and redirect URIs
iOS Google Login configuration complete!
Congratulations! You've completed configuring Google Login for iOS. Run the app and test google sign in.
C. Android Configuration
Required Parameters
You should make note of the following parameter to activate Google Login within your Median App.
- Web Client ID (found in Step C2)
Note: Unlike iOS, Android only requires the Web Client ID from your Google Cloud platform console in Step C2.
Already have a Google OAuth client ID?
If you already have an existing Google OAuth client ID, go to Log into your account and skip to Step C2.
For Firebase Console users
If you use Firebase Console, make sure to configure the Support Email in Firebase Console > Settings > General > Public Settings > Support Email
Step C1. Create an OAuth client ID.
Go to the Google Cloud platform console and complete the following steps.
(i) Create credentials by clicking on the "+CREATE CREDENTIALS" tab and then select "OAuth client ID" as shown in the green box in the image below.
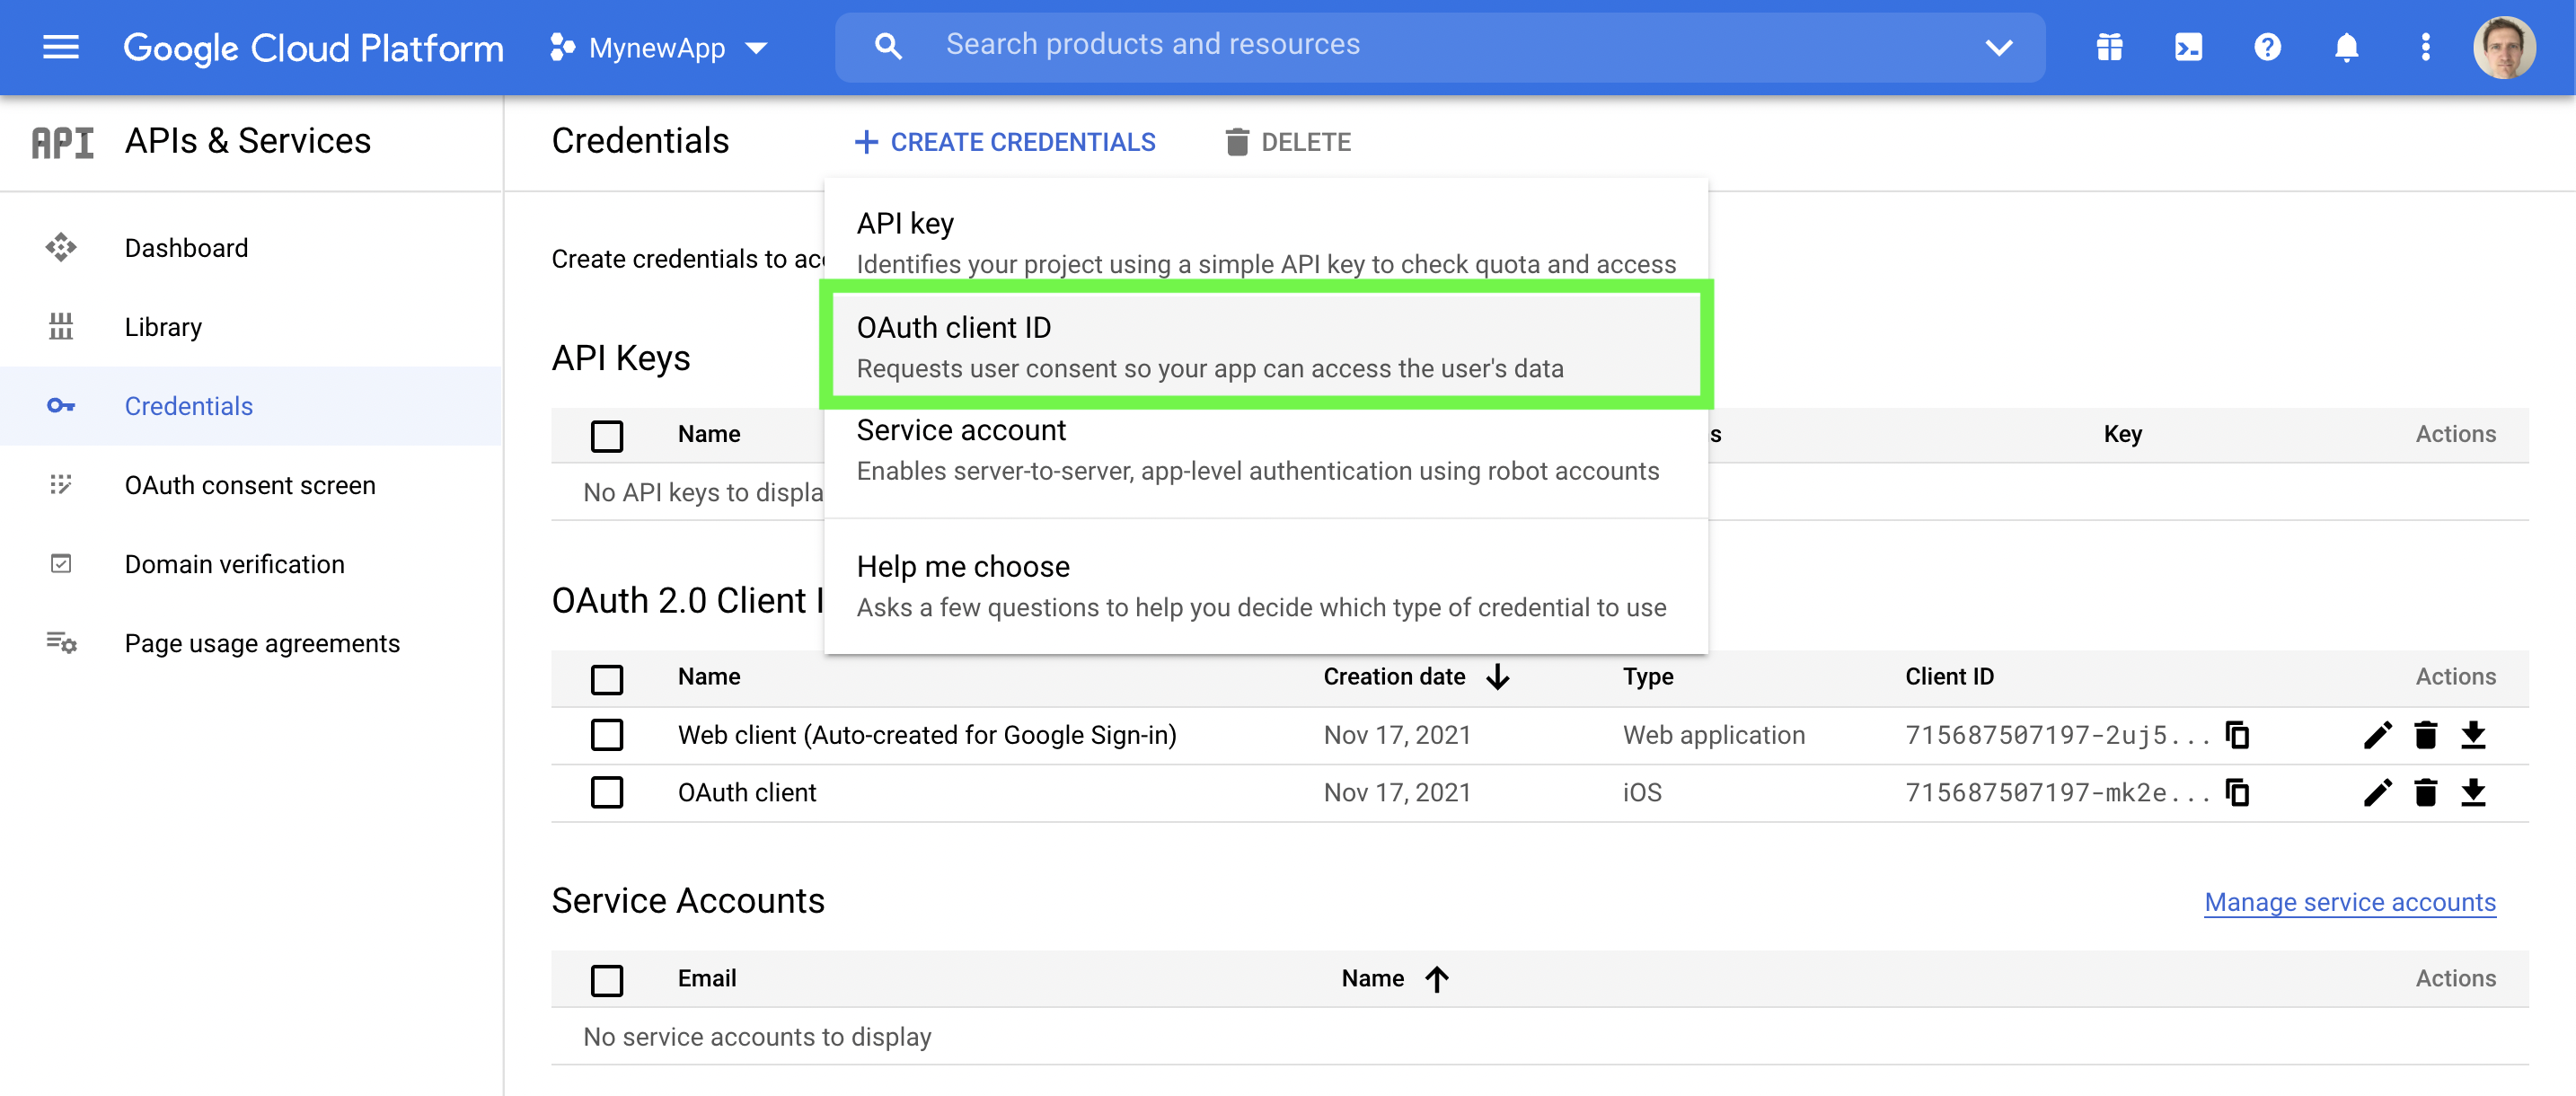
Click +CREATE CREDENTIALS and then select OAuth client ID
(ii) Select Android from Application Type pull down menu as shown.
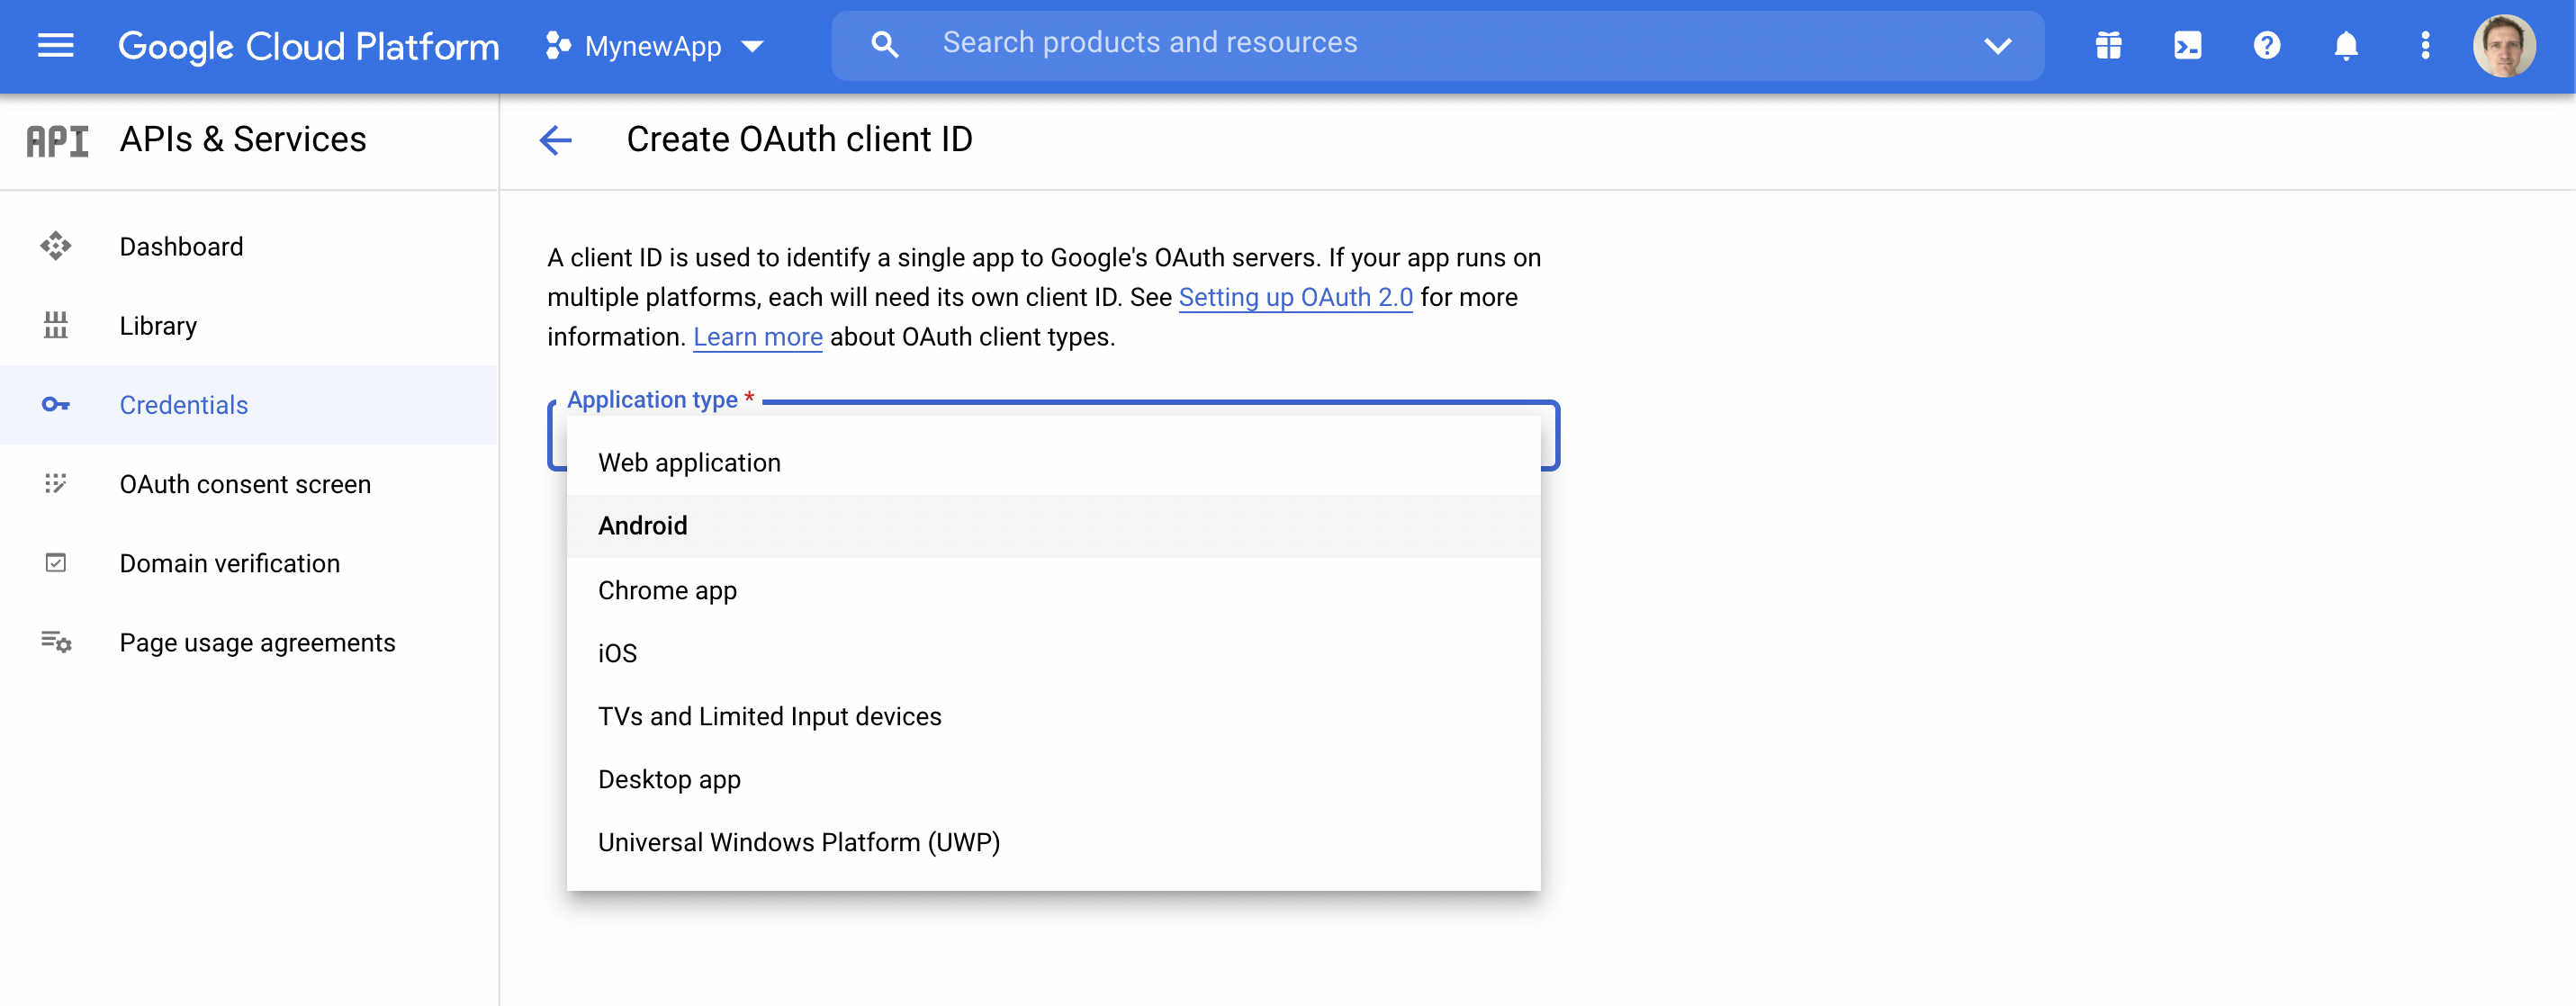
Select Android
(iii) Enter your package name and SHA-1 certificate fingerprint. If you are using Median to sign your Android app contact our team to obtain this value. If you are using Google Play App Signing it is available from the Google Play Console on the Release > Setup > App Integrity page.
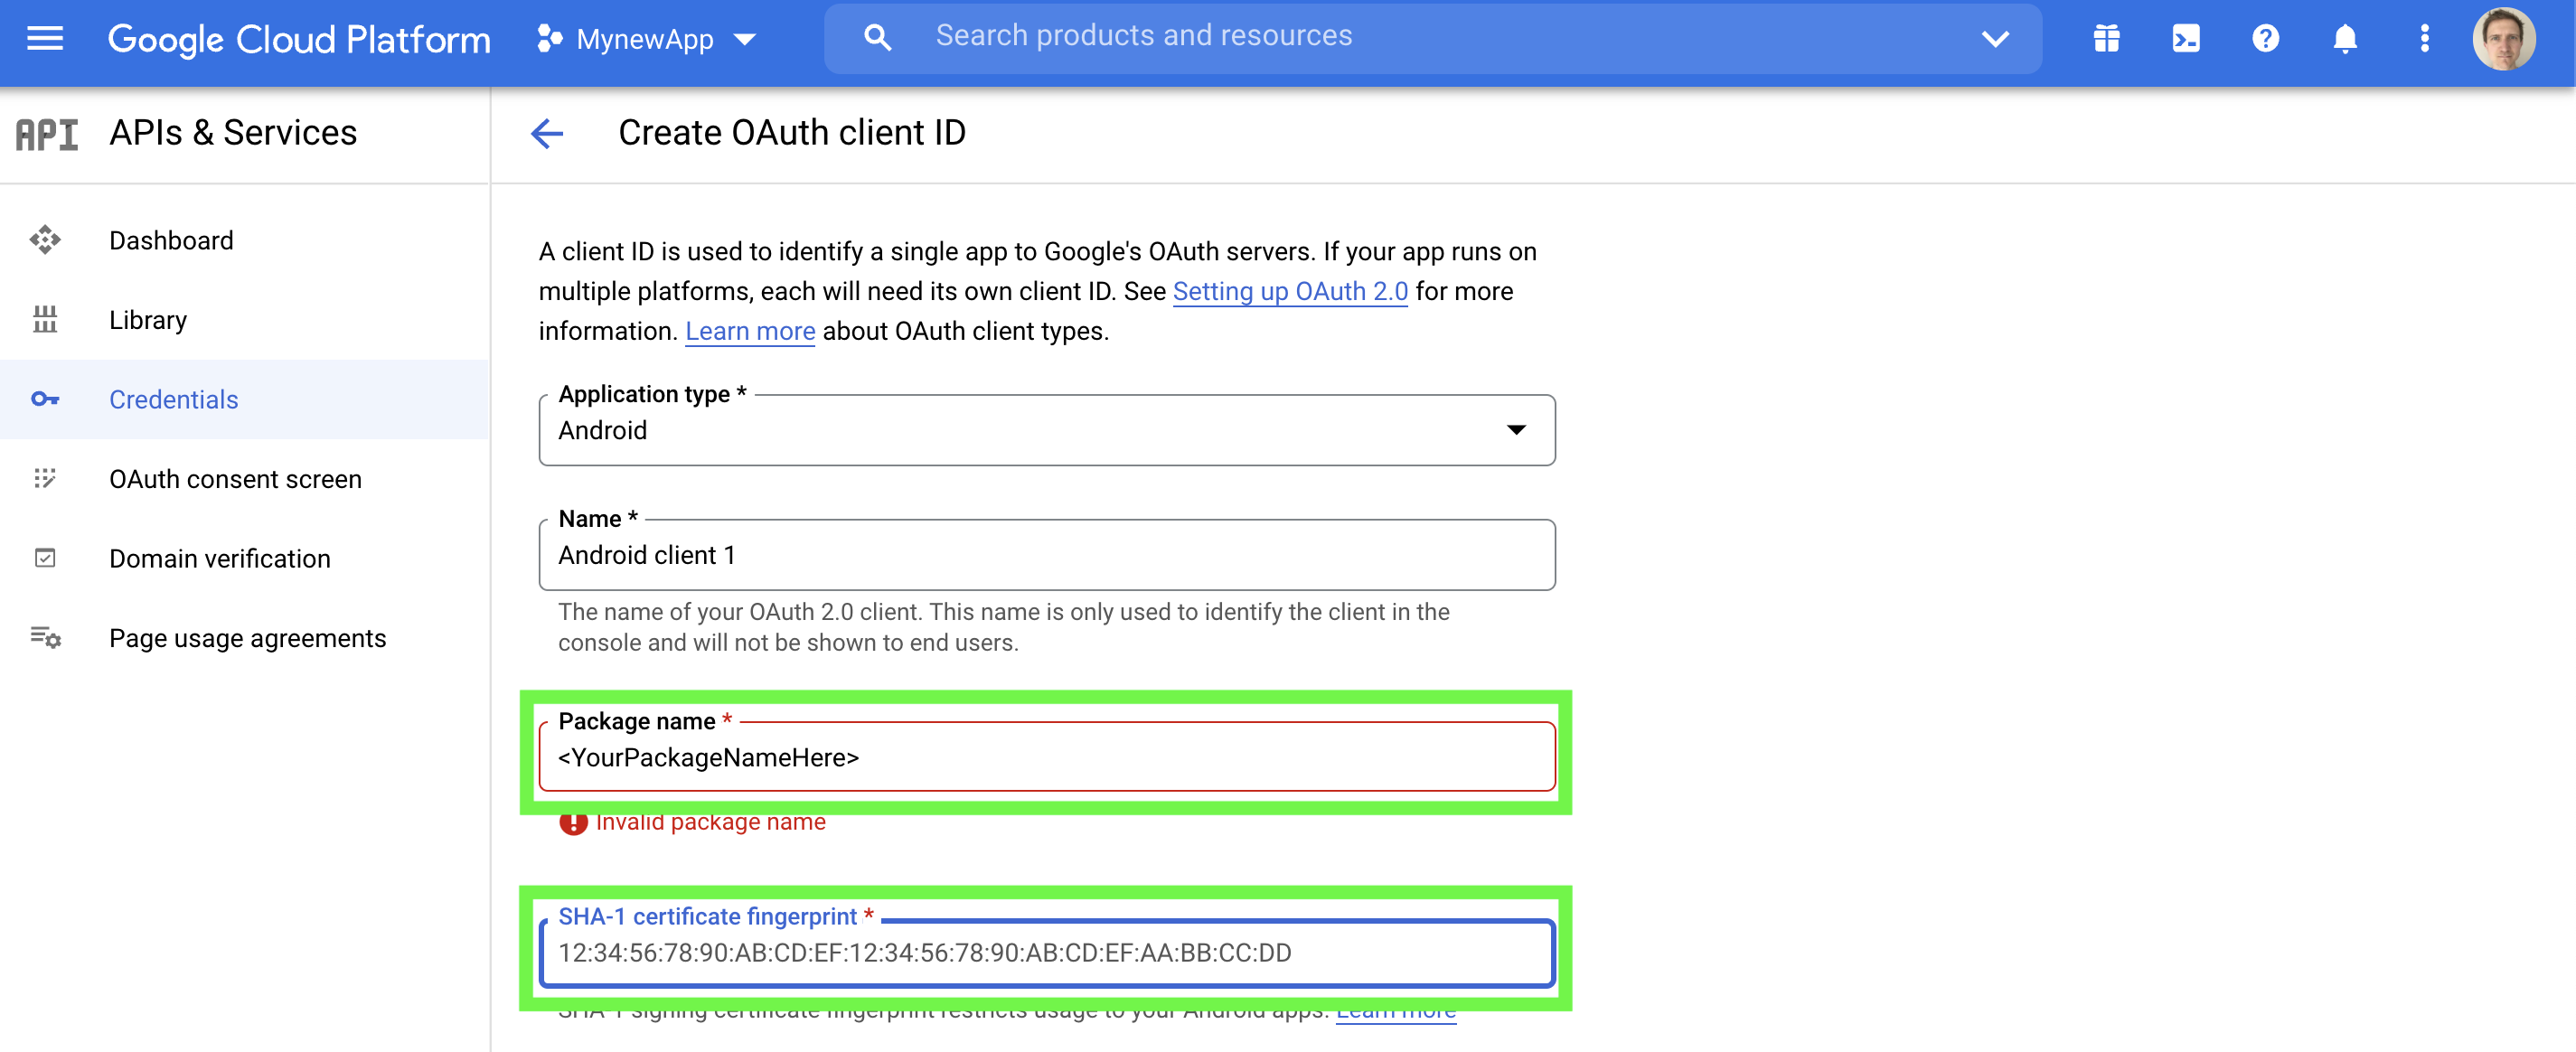
Step C2. Record Web Client ID
(i) Go to the API credentials section in your Google Cloud platform console and complete the following steps to record your Web client ID.
(ii) You may see several client IDs. Under OAuth 2.0 Client IDs, look for “Web client (Auto-created for Google Sign-in)” as shown below in the green box. Click the copy to clipboard button. The Web Client ID is required for your Median Android app.
For Android Median requires
Web client (Auto-created for Google Sign-in)You must always use the OAuth 2.0 Client ID
Web client (Auto-created for Google Sign-in)for your Median Social Login configuration for Android.Do not use the Client ID that was created above in Step C1.
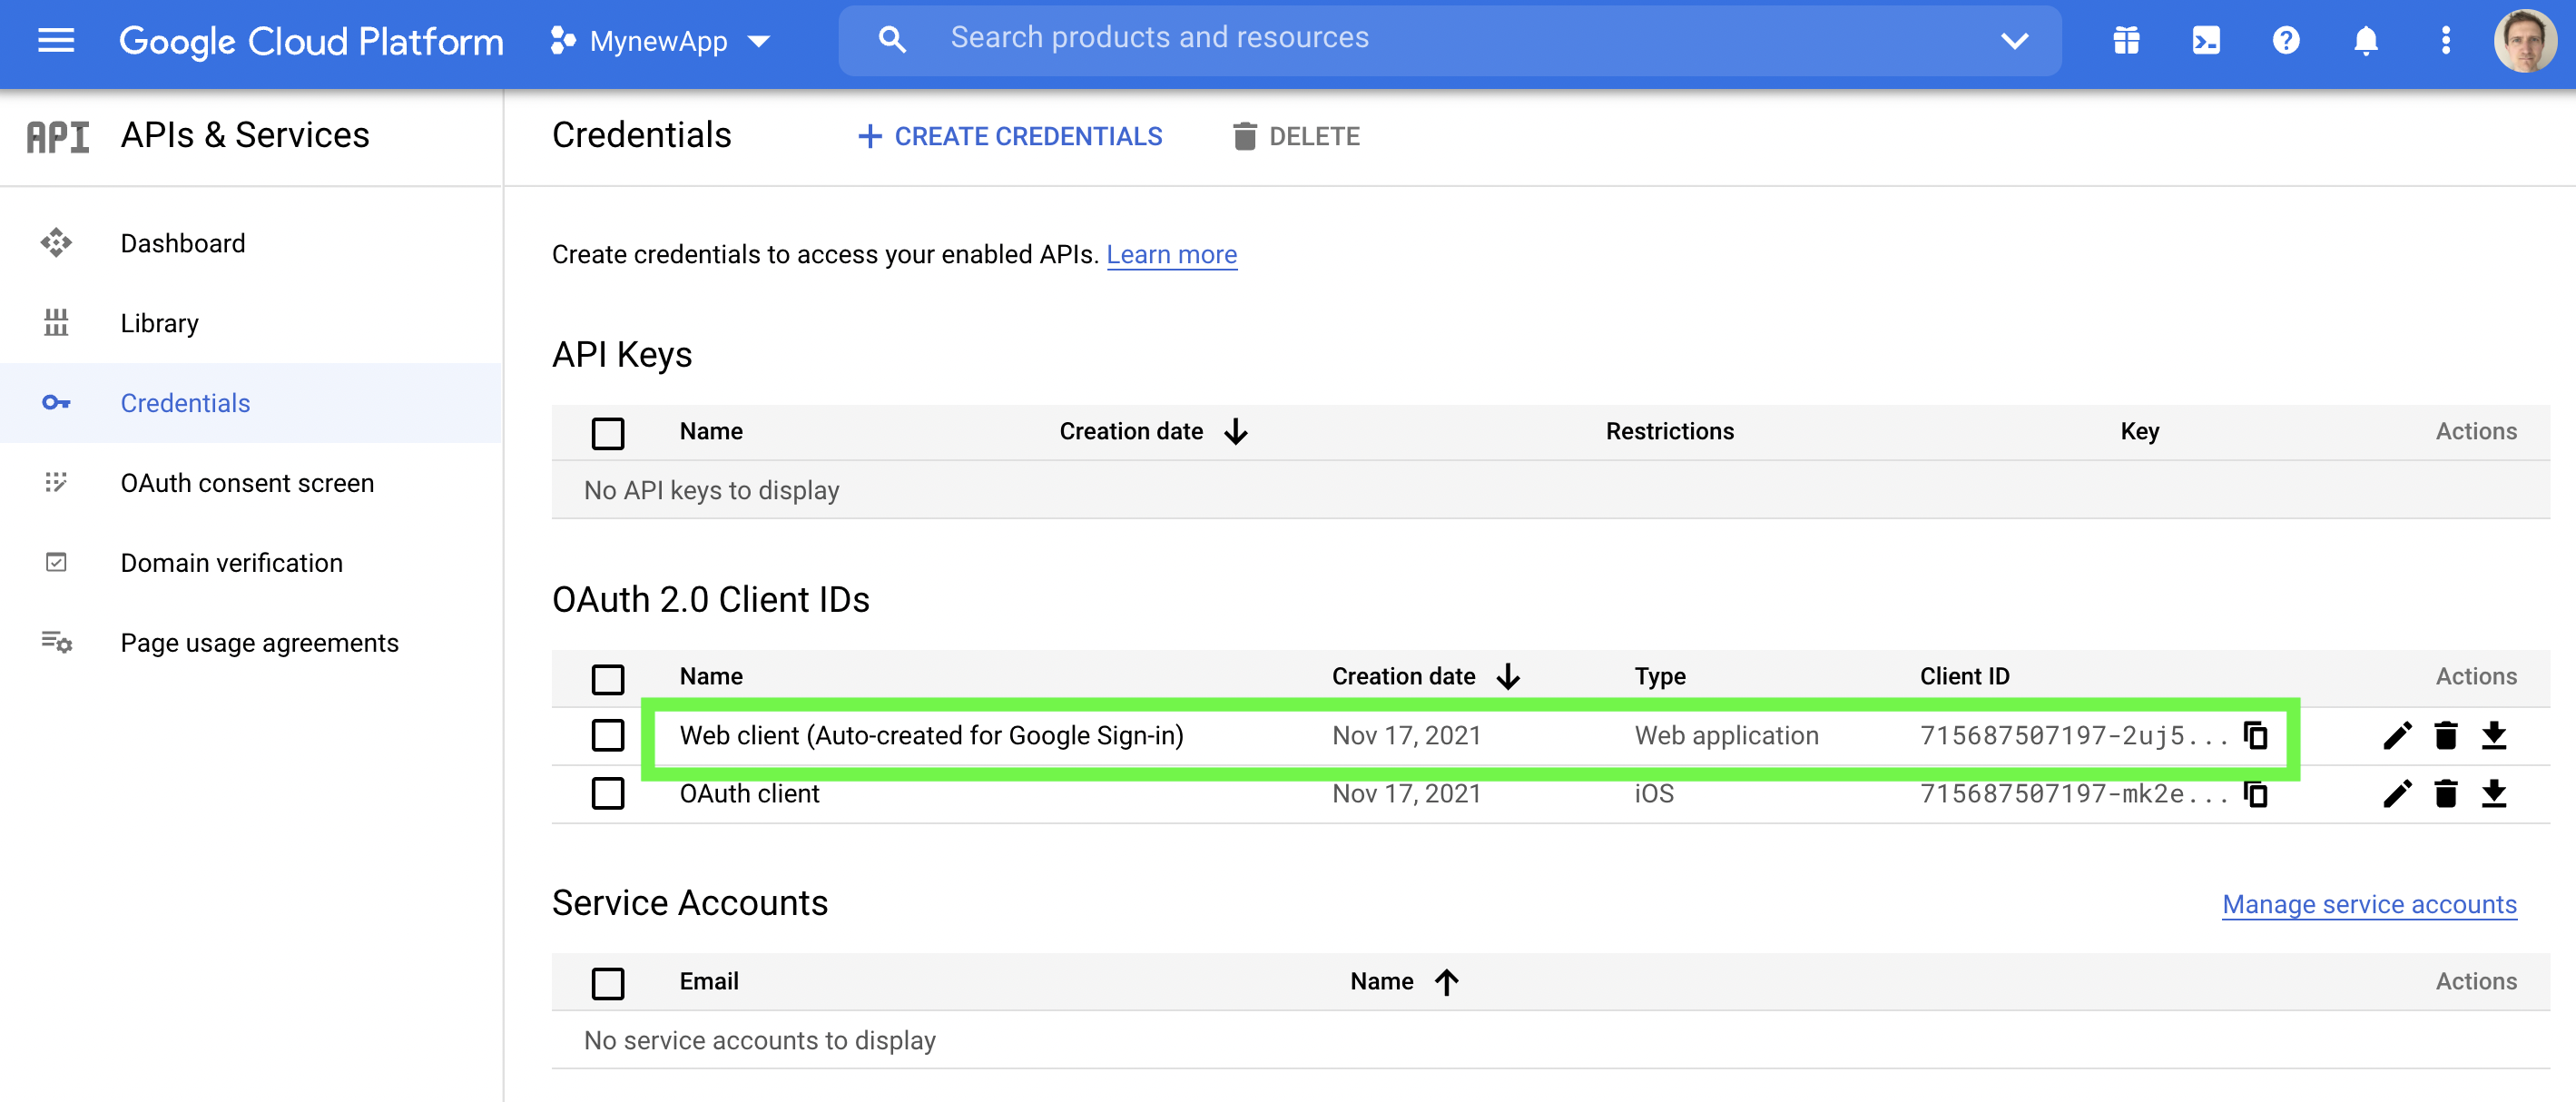
Locate Web client (Auto-created for Google Sign-in)
Step C3. Set the authorized JavaScript Origins and redirect URLs
If you are using the server-side redirect method you must specify the redirect URI for your server endpoint.
In the same API credentials section as the previous step, click the pencil edit icon just to the right and click "+ADD URI". Then click blue save button at the bottom of the screen.
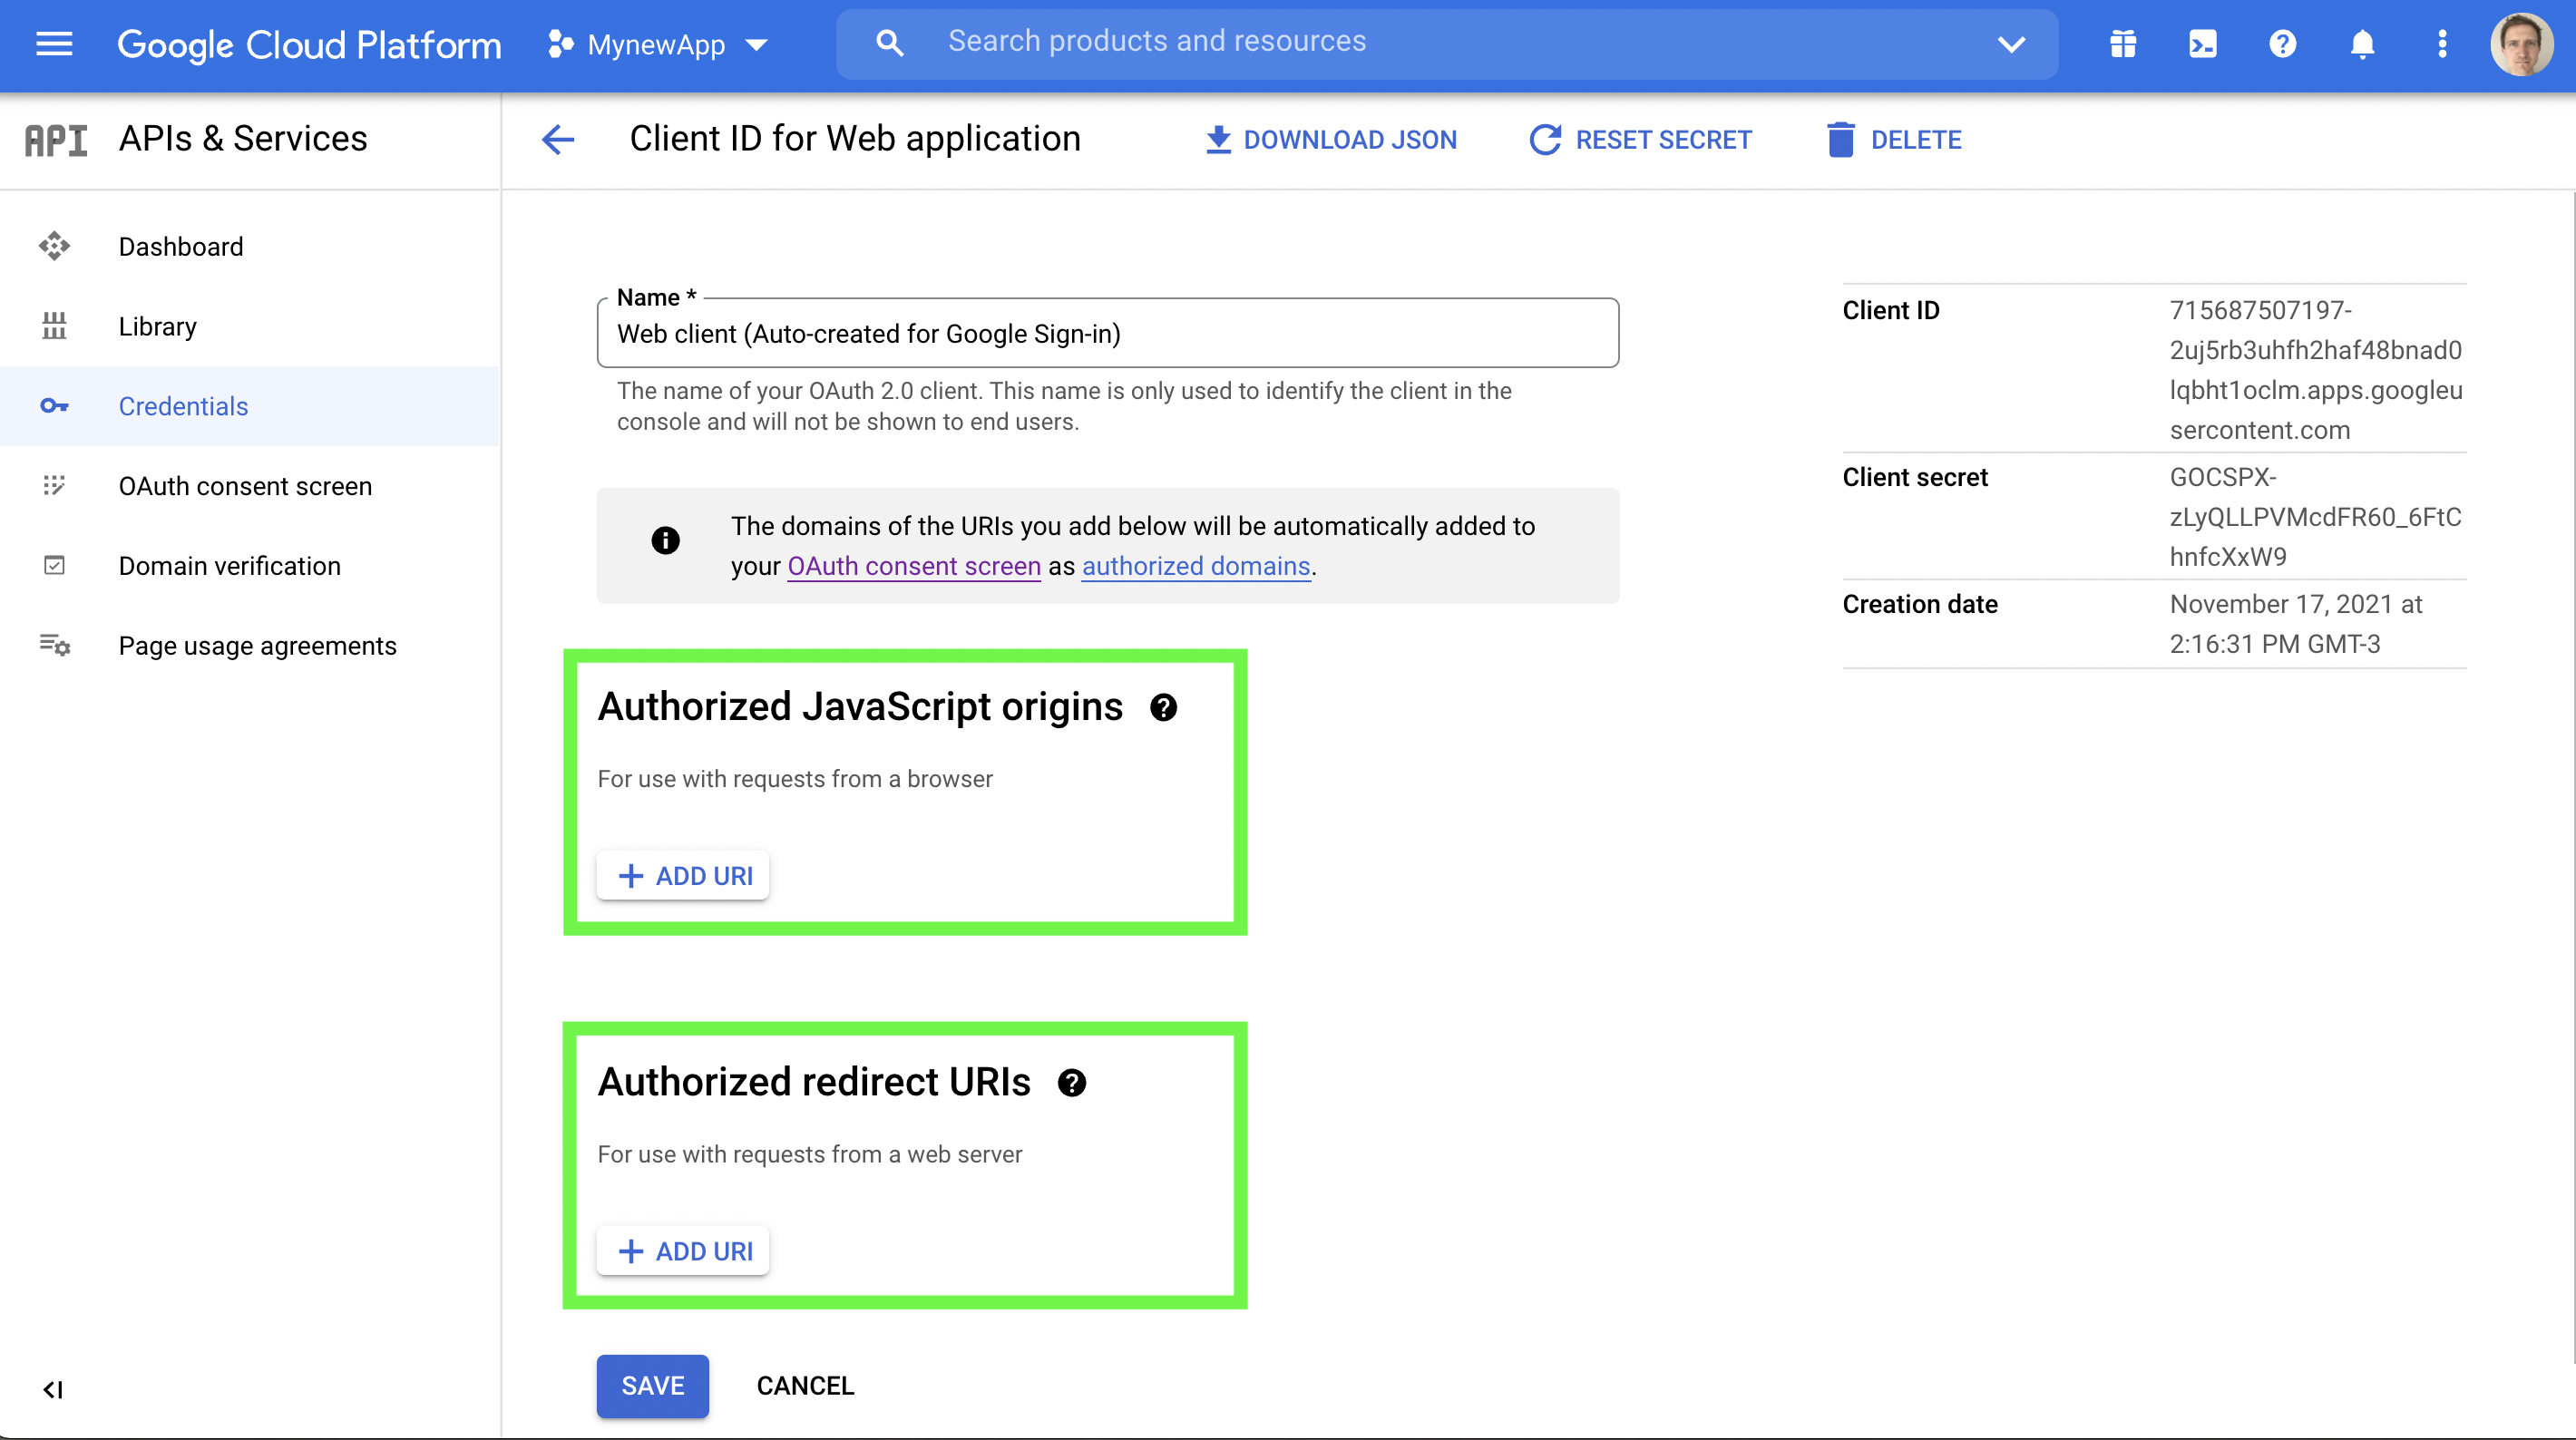
Step C4. Testing Locally
If you are compiling your debug/release application from multiple machines you will need to create an OAuth client ID and provide the SHA-1 Certificate fingerprint of each local machine.
(i). Similar to Step C1. Go to the Google API Console, "+CREATE CREDENTIALS" tab and then select "OAuth client ID".
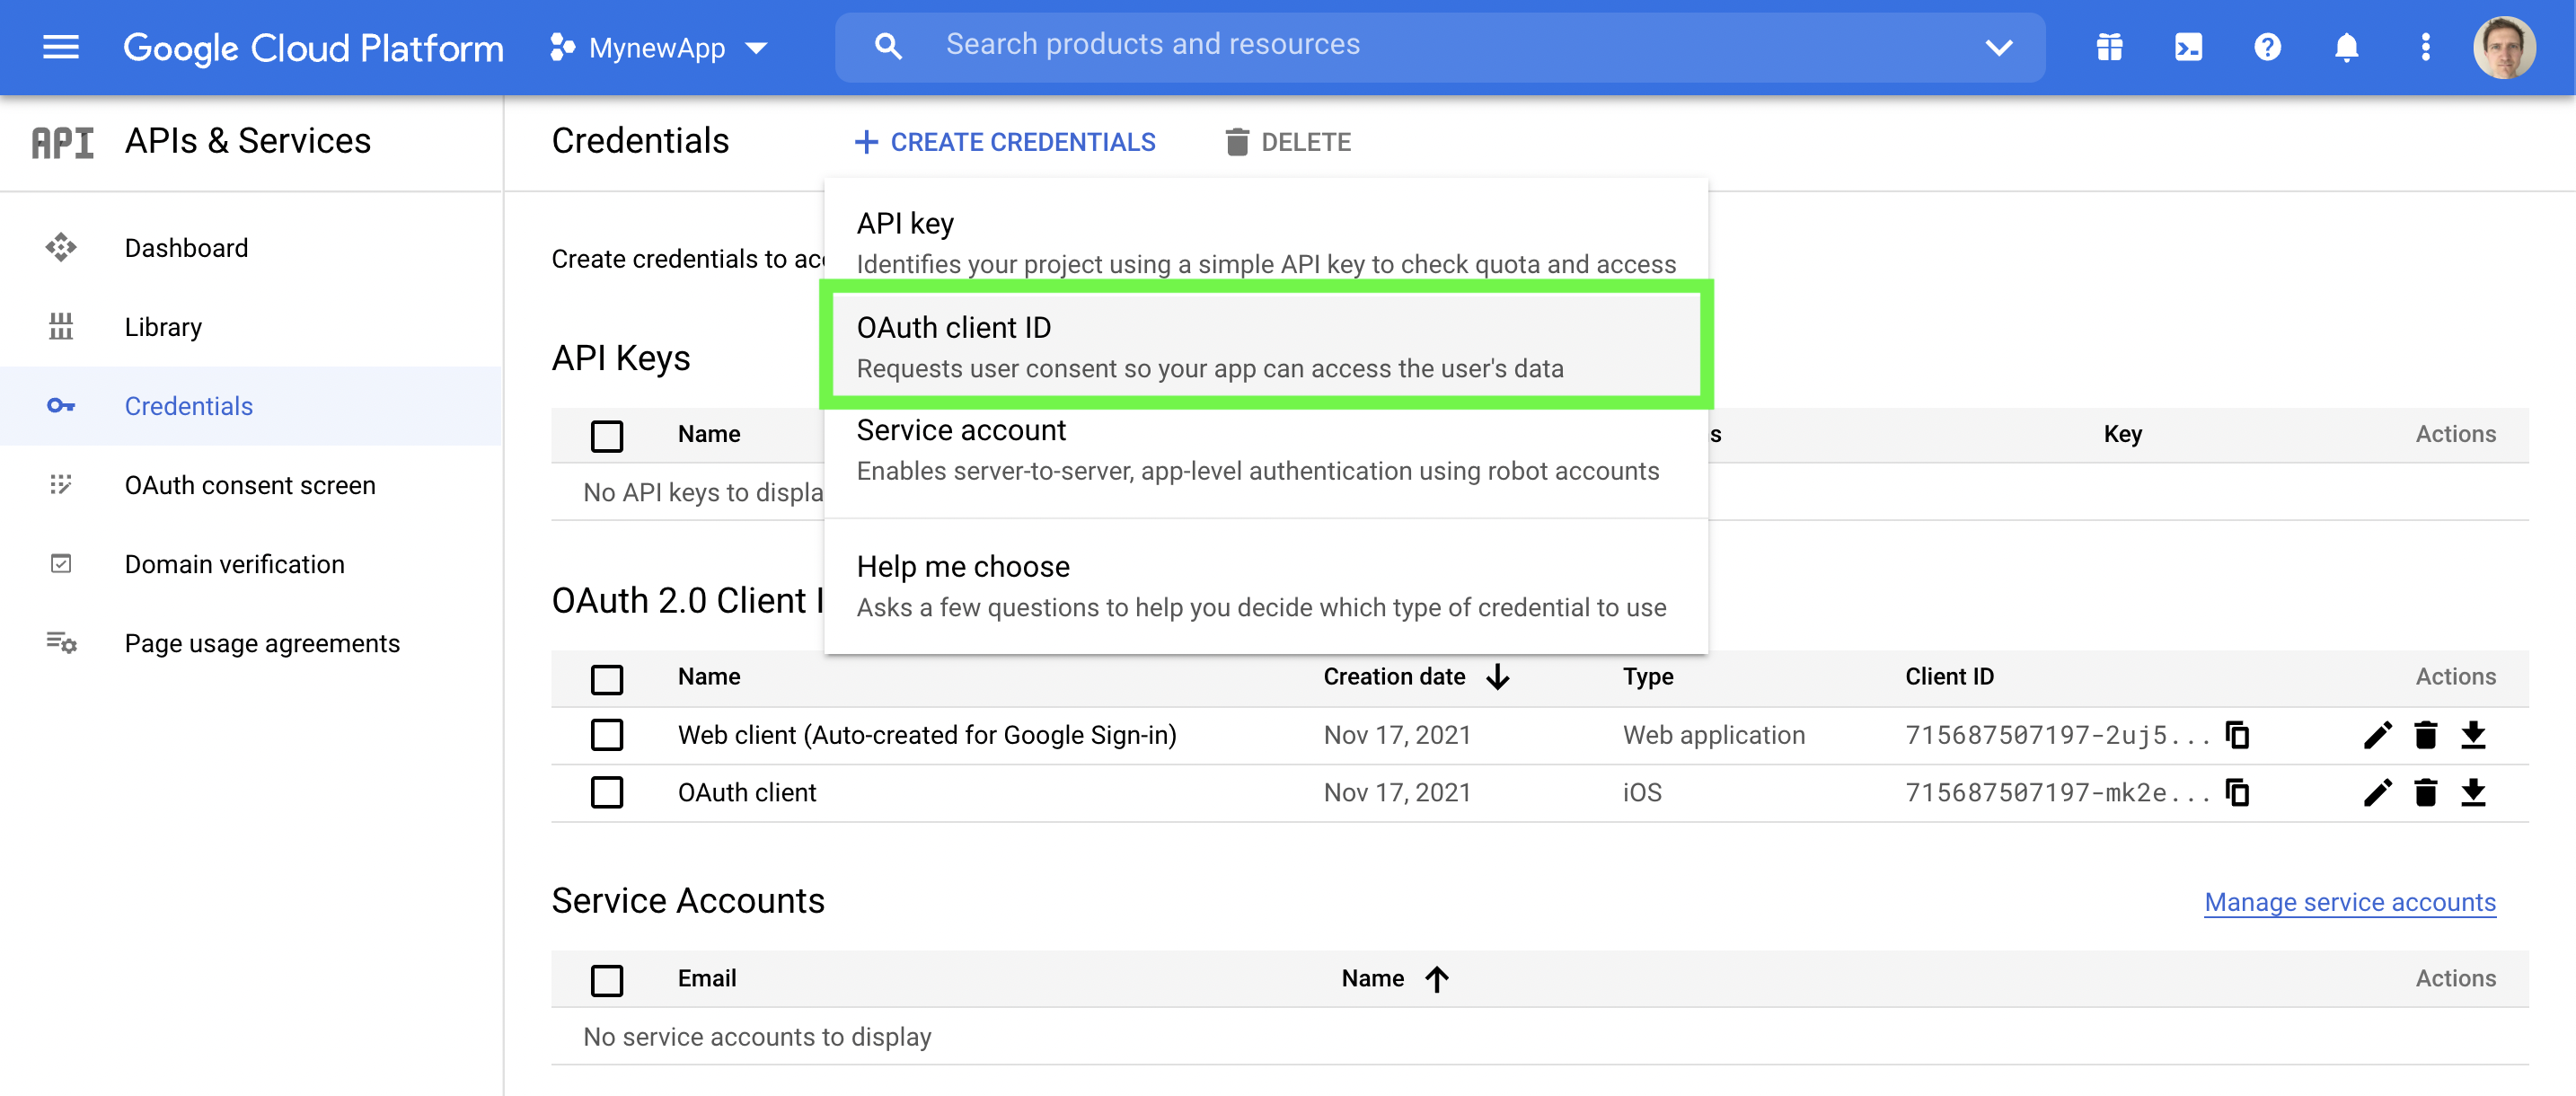
Click +CREATE CREDENTIALS and then select "OAuth client ID"
(ii) As before, select Android and then provide a Name, e.g. "John's Dev Machine"
For the Package Name, if you are building a debug variant in the Android Studio, by default the app build.gradle uses a .debug as an applicationIdSuffix so you will need to append .debug at the end of your package name. For example com.yourcompany.app.debug.
For the SHA-1 certificate fingerprint obtain the fingerprint from your local machine following the steps below.
Using a local SHA-1 certificate fingerprint
Use the following command to obtain the fingerprint of your local SHA-1 Keystore and enter in the field in the red box below.
keytool -keystore <path-to-debug-or-production-keystore> -list -vNote that typically for debug, the keystore is usually stored at: `~/.android/debug.keystore`.
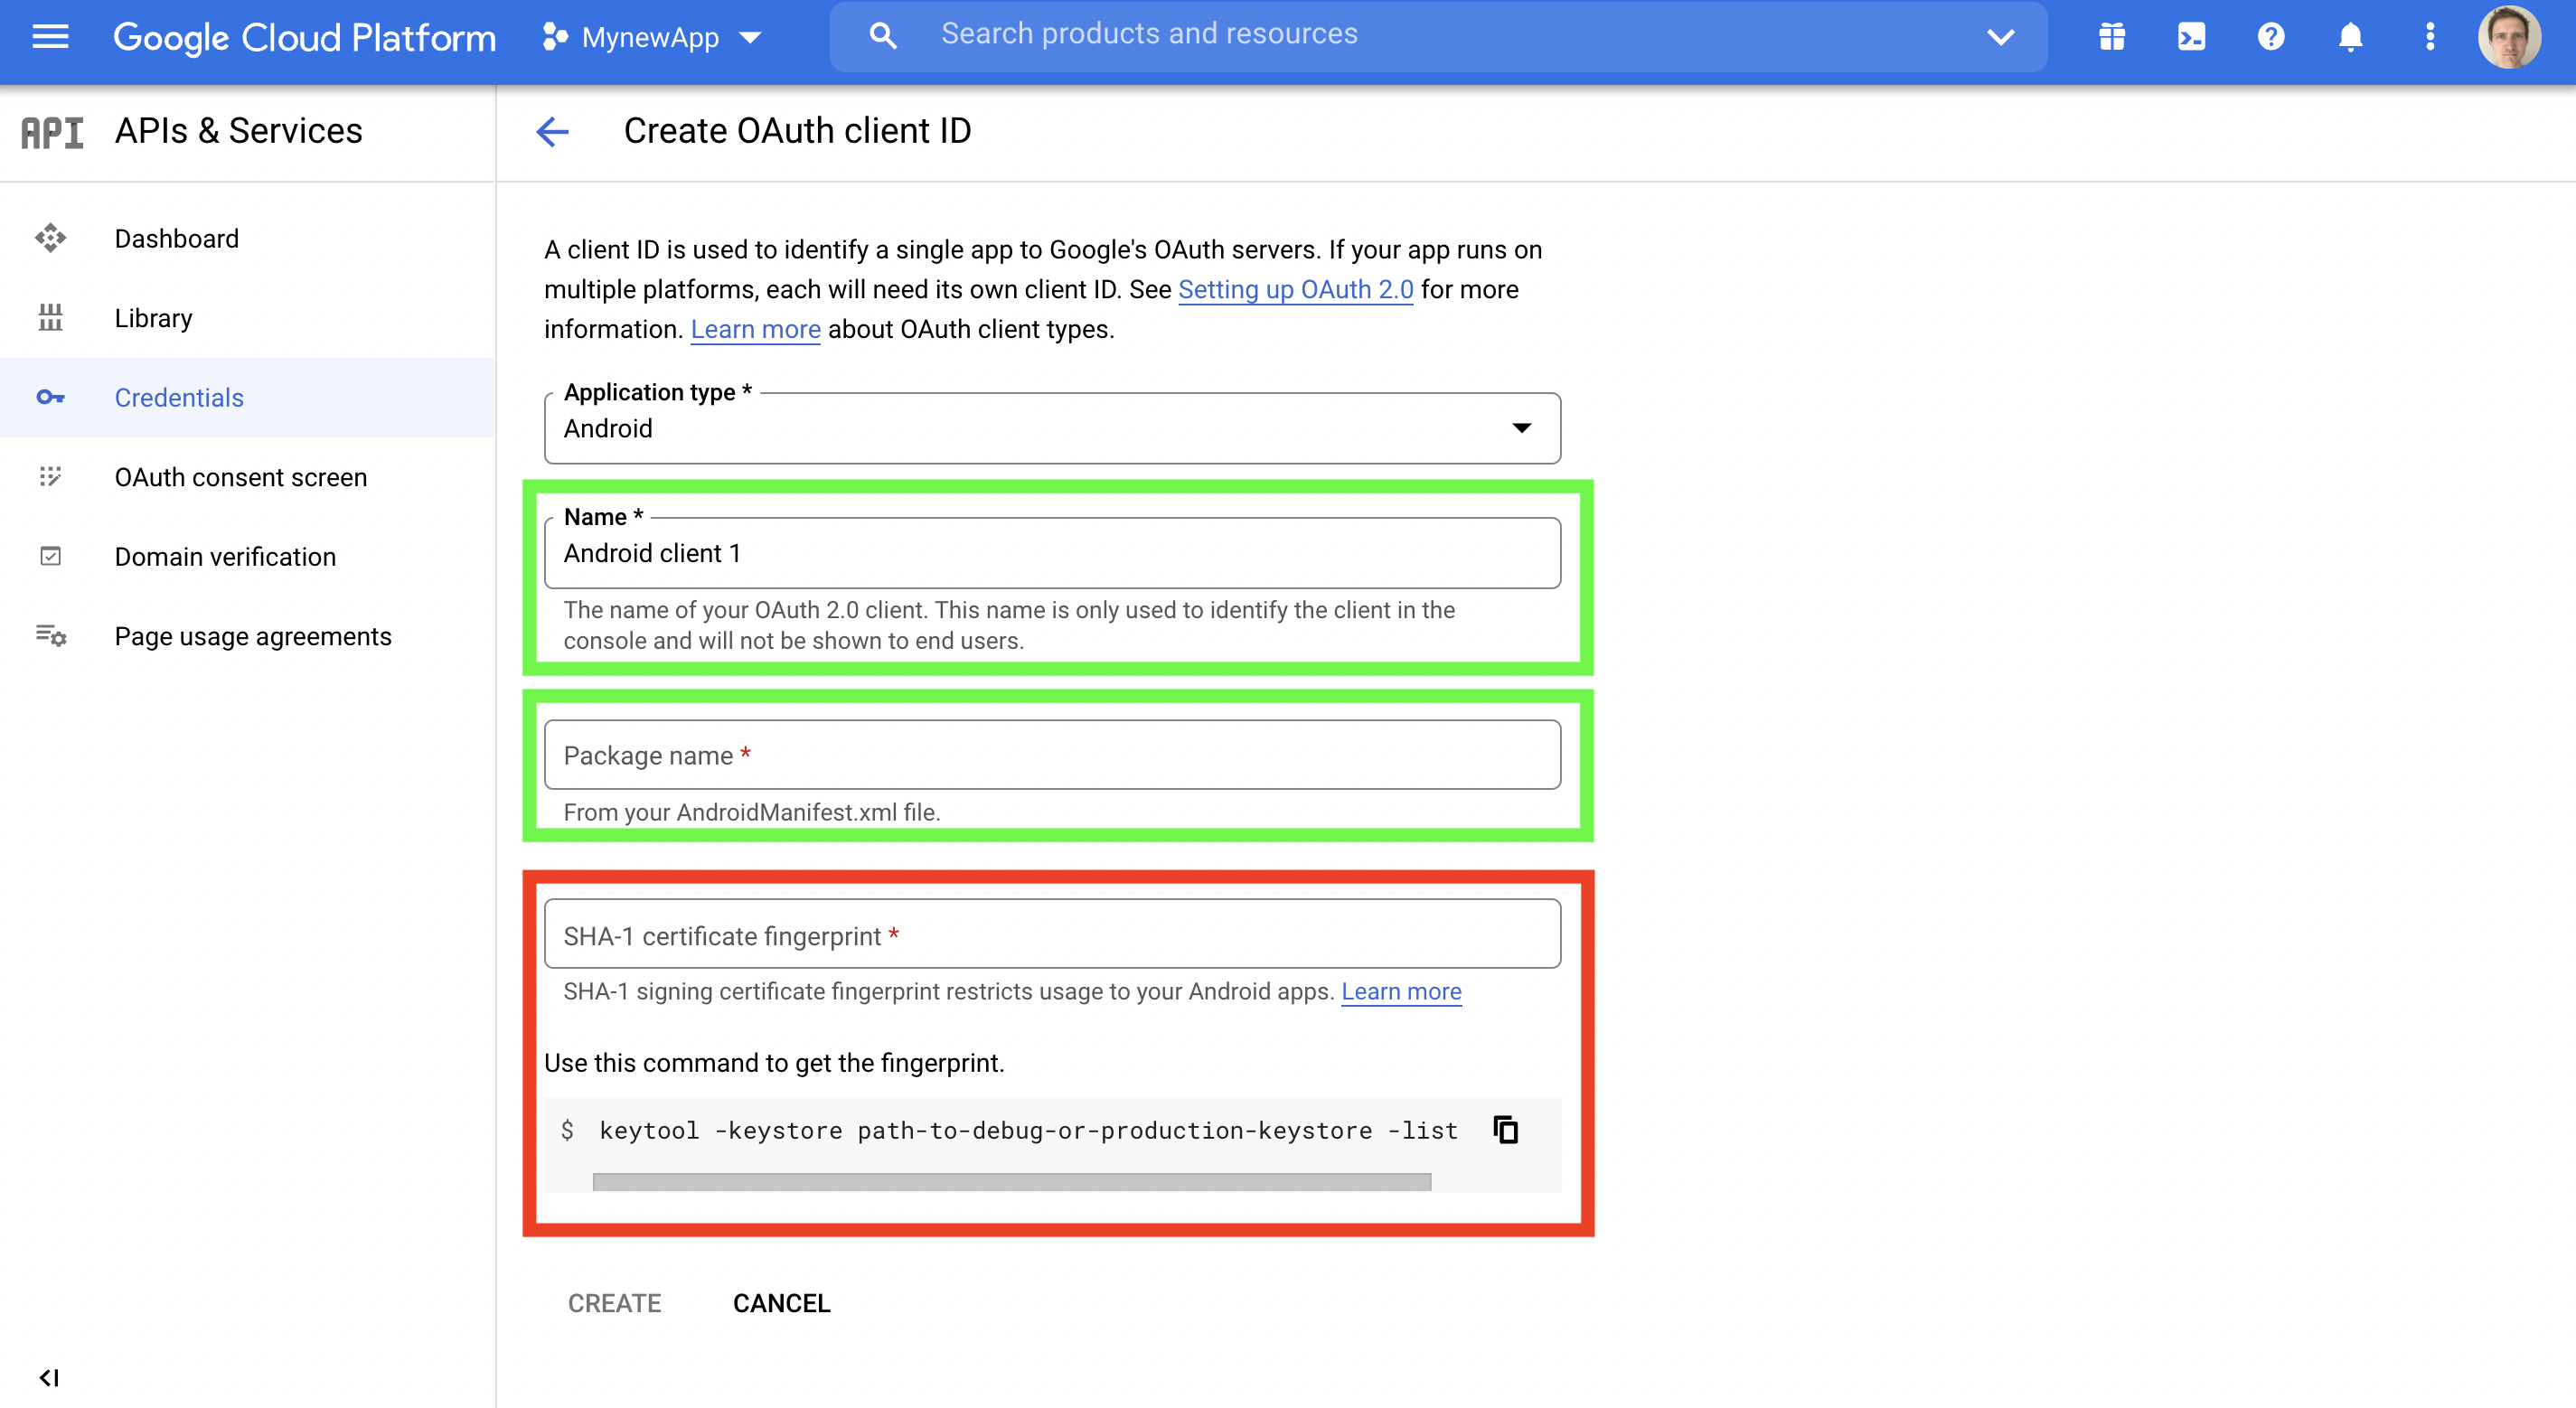
Provide a Name, the Package name, and SHA-1 Certificate fingerprint
(iii). Click Create and wait for the update to propagate. There is no need to change the client ID in the app itself.
Updated 29 days ago